|
|
|
Categories
|
|
Information
|
|
Featured Product
|
|
|
 |
|
|
There are currently no product reviews.
 ;
Quick response and exactly what I was looking for and at a great fair price!
;
5 star quality on these downloadable manuals. Easy to read and all the information is there. A must when doing a custom install or needing to service your precious old school electronics.
;
So usefull to make my installation a breeze. 5 stars on quality.
;
very helpful, the information in these manuels are very detailed
;
Please tell us what you think and share your opinions with others. Be sure to focus your comments on the product. You will receive $2.00 of store credit for Your review.
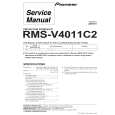
INSTALLATION AND ASSEMBLY
(5) Paste spacer A (BMR1073) to the top board of the multi-projection unit and spacers B (BMR1074) to the two sides at the position shown in the figure after peeling off the seal. (7) Attach the attachments R and L to the unit through the top board of the unit using the screws (M6 � 20) and then attach attachments R and L to the unit from the back using screws (M6 � 20). (2 screws � 2 locations).
(6) Insert the multi-projection unit from the rear of the unit in this state.
4321 4321 4321
* Paste after adjusting the center of the top board to that of spacer A.
* Paste without covering the fan. *Drop the screw-lock fluid to screws so as not to loosen. (4 points)
(8) Check the Focus and reajust if necessary.
(9) Attach the cover (BNE1012) to the top board of the unit using the four screws (M5 � 15).
Screw (M5 � 15)
Unit
51
|
|
|
> |
|