|
|
|
Categories
|
|
Information
|
|
Featured Product
|
|
|
 |
|
|
There are currently no product reviews.
 ;
The product manual I received was exactly what I was looking for, delivered painlessly at a very fair price. I can't ask for any more than that.
;
Very well done!!!!! congratulations. It was a bit longer than usual the wiating time even if it was on time (in 24 hours).
;
Last week I bought a second hand BAUKNECHT TRK4850 DRYER. It is a professional machine with many programs and switch options. I feared it would be a huge quest to find a manual. I was delighted when I found owner-manuals.com. After payment I received the file to download the next day already. The quality is great. I am very happy. Thanks!
but kindly the distributions of the operating programs not find in the owners manual,can you help me to understand the operating programs instructions thank you
;
Very good copy, very readable and easy transaction as always.
;
It is perfect, exactly what we needed. It's like the paper version but less clutter.
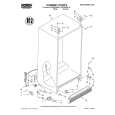
Removing
the meat drawer
and cover
Pull out to the stop, lift the front and pull again.
To remove the meat drawer: 1. Slide the meat drawer straight out to the stop. 2. Lift the front slightly. 3. Slide out the rest of the way. 4. Replace in reverse order. To remove the cover: 1. Remove the crisper, the crisper cover and the meat drawer. 2. Tilt front of cover up. 3. Lift cover at back and pull straight out. 4. Replace in reverse order.
Adjusting
the meat drawer
temperature
Cold air flows against the meat drawer through an opening between the freezer and the refrigerator. This helps keep the meat drawer colder than the rest of the refrigerator for better storage of meats. Slide the control to let more or less cold air through.
Removing
the freezer
bin/basket
I
Pull out to the stop, lift the front and
To remove the bin/basket: 1. Slide out to the stop. 2. Lift the front to clear the stop. 3. Slide out the rest of the way. To replace the bin/basket: 1. Place on the slides. 2. Make sure the wire stops clear the front of the slides. 3. Slide in all the way.
pull again.
12
|
|
|
> |
|