|
|
|
Categories
|
|
Information
|
|
Featured Product
|
|
|
 |
|
|
There are currently no product reviews.
 ;
This was a hard to find manual. When I did find it , some sites wanted way too much for the file.
Owner-manual .com had it for a really reasonable price. Not only that but it was sent very quickly and was a quality scanned document, unlike some others I purchased from a different site.
Good job guys!!
Larry
;
Fast and courteous service. Product delivered as described. Thank you.
;
Last week I bought a second hand Panasonic AG-7500 SVHS Hi-Fi Video Cassette Recorder. It is a professional machine with many video and audio options. I feared it would be a huge quest to find a manual. I was delighted when I found owner-manuals.com. After payment I received the file to download the next day already. The quality is great. I am very happy. Thanks!
;
The owner's manual/operating instructions that I purchased was the original factory document and it was in at least three and maybe more languages. I no longer have it because I sold the tape recorder and included the owner's manual/operating instructions and a service/repair manual that I bought on ebay for the new owner.
;
This manual is very useful. Because pioneer sx-q180 is unhandy to use without manual.
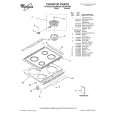
BAKEWARE
To cook food evenly, hot air must be able to circulate. Allow 2 in. (5 cm) of space around bakeware and oven walls. Use the following chart as a guide. NUMBER OF PAN(S) 1 2 3 or 4 POSITION ON RACK
Meat Thermometer
On models without a temperature probe, always rely on a meat thermometer to determine doneness of meat and poultry. The internal temperature, not appearance, is what counts. A meat thermometer is not supplied with this appliance. s Insert the thermometer into the center of the thickest portion of the meat or inner thigh or breast of poultry. The tip of the thermometer should not touch fat, bone or gristle.
s
Center of rack. Side by side or slightly staggered. Opposite corners on each rack. Make sure that no bakeware piece is directly over another.
After reading the thermometer once, push it into the meat ¹�� in. (1.25 cm) more and read again. If the temperature drops, cook the meat or poultry longer. Check all meat in 2 or 3 places.
s
Bakeware
The bakeware material affects cooking results. Follow manufacturer�s recommendations and use the bakeware size recommended in the recipe. Use the following chart as a guide. BAKEWARE/ RESULTS Light colored aluminum s Light golden crusts
s
Oven Vent
RECOMMENDATIONS
1
s
Use temperature and time recommended in recipe.
1. Oven Vent
Even browning
s s s
Dark aluminum and other bakeware with dark, dull and/or nonstick finish s Brown, crisp crusts
May need to reduce baking temperatures 25°F (15°C). Use suggested baking time. For pies, breads and casseroles, use temperature recommended in recipe. Place rack in center of oven. Place in the bottom third of oven. May need to increase baking time.
The oven vent releases hot air and moisture from the oven, and should not be blocked or covered. Doing so will cause poor air circulation, affecting cooking and cleaning results. Never set plastics, paper or other items that could melt or burn near the oven vent. The element can be used when the oven is in use as long as the cookware does not extend more than 1 in. (2.5 cm) over the element.
s
Baking and Roasting
Before baking and roasting, position the racks according to the �Positioning Racks and Bakeware� section. When roasting, it is not necessary to wait for the oven to preheat before putting food in, unless recommended in the recipe. To Bake or Roast: 1. Push in and turn the oven control knob to the desired temperature setting. The OVEN HEATING light will turn on. On some models, set the oven selector to BAKE and turn the oven temperature control knob to the desired temperature setting. The OVEN ON indicator light will turn on and will turn off once the oven is preheated. 2. Place food in oven. The bake and broil elements will turn on and off to keep the oven temperature at the setting. The OVEN HEATING indicator light will turn on and off with the elements. 3. Push in and turn oven control knob to OFF when finished. On some models, turn both the oven selector and oven temperature control knob to OFF. The OVEN ON indicator light will turn off.
Insulated cookie sheets or baking pans s Little or no bottom browning Stainless steel s Light, golden crusts
s
s s
s
May need to increase baking time.
Uneven browning
s
Stoneware s Crisp crusts Ovenproof glassware, ceramic glass or ceramic s Brown, crisp crusts
Follow manufacturer�s instructions. May need to reduce baking temperatures 25°F (15°C).
s
10
|
|
|
> |
|