|
|
|
Categories
|
|
Information
|
|
Featured Product
|
|
|
 |
|
|
There are currently no product reviews.
 ;
It is perfect, exactly what we needed. It's like the paper version but less clutter.
 ;
Received my manual within 24 hours. Very clear scan of the manual I needed. Thanks!
;
Very clear scan, I recommend it. Definitely a must have for any 3362 owner.
Alpine could have written a slightly more complete manual, though. It's already pretty huge, but the unit has so many functions, I feel some more explanation would have been better.
Yamaha's manual of their comparable YDSP-1 is a little better in my opinion.
;
Immediate response with excellent service - highly reccommended
;
Correct manual received and of good quality but the contents of the file for the Service Manual for the same monitor is for a 20" TV not the RGB Monitor.
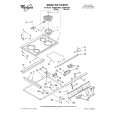
Baking/roasting
1. Position the rack(s) properly before
turning on the oven. For further information, see �Positioning racks and pans� on page 9. 2. Press the Bake pad. The last oven temperature to be set appears on the display.
3. To cook at a different temperature, use the Increase/Decrease pad(s). Press A
to raise the temperature or V to lower the temperature. Use these pads until the desired temperature shows on the small display.
4. When the oven starts to heat, ON and the
changing temperature (starting at 100°F) will be displayed. When the oven reaches the set temperature, a tone will sound.
NOTE: You can change the temperature
setting any time during the Bake cycle by repeating Steps 2 and 3 above.
5. When baking, preheat the oven. (Preheating is not needed when roasting.) The oven is preheated when you hear a onesecond tone. 6. Put food in the oven. During baking/roasting, the elements will turn on and off to keep the oven temperature at the setting.
NOTE: The top element helps heat during
baking/roasting, but does not turn red.
7. When baking/roasting
is done, press the
Off/Cancel pad. The time of day will show on the display and all other displays will go off.
14
|
|
|
> |
|