|
There are currently no product reviews.
 ;
Great scan but please note that it is entirely in GERMAN.
 ;
High quality scan of the manual, very quick and easy download and very important, a truly honest price. thanks
;
Minden rendben, de két megjegyzés, az ábrák nehezen kivehetők és a fizetés után 24 órát kell várni a letöltésre.
;
Manual correct, and complete. Downloads cleanly. Format of manual was presumably difficult to PDF to A4, but works reasonably well.
;
This was a hard to find manual. When I did find it , some sites wanted way too much for the file.
Owner-manual .com had it for a really reasonable price. Not only that but it was sent very quickly and was a quality scanned document, unlike some others I purchased from a different site.
Good job guys!!
Larry
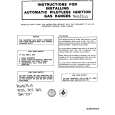
7. Removal of SUB1 Board
1. Disconnect CN101 on SUB1 Board. 2. Unscrew 2 screws (G) so that the SUB 1 Board can be removed.
9. Removal of MAIN Board
1. Disconnect CN1 on MAIN Board so that the EVF cable can be removed. 2. Unscrew 4 screws (H) so that the MAIN Board can be removed. SCREWS (H)
CN101
SCREWS (G) SCREWS (H)
8. Removal of SUB2 Board
1. Unscrew hex screw fixing all front knobs. (PEAKING, CONTRAST and BRIGHT knob) 2. Unscrew hex nut (A) and then pull out the each front knob so that the SUB 2 board can be removed.
10. Removal of Guard Bar
1. Unscrew 2 screws (I) so that the Guard bar can be removed.
SCREWS (I)
Hex nut (A)
DIS-3
|