|
|
|
Categories
|
|
Information
|
|
Featured Product
|
|
|
 |
|
|
There are currently no product reviews.
 ;
Manual was destroyed and this purchase made it possible to recover my manual . It was easy to down load and smooth to use thanks .
 ;
Turns out this was not the manual i was looking for. The concertmate 670 keyboard i have is a "Realistic" model made for Radio Shack and none of the diagrams on the owners manual i received matches up. HOWEVER, I must say the service Owners Manual provides was fast and efficient by being available online. The manual was in good readable condition and easily downloaded.
;
Great price, Quick delivery, the document was very usefull A+++++++++++++++
;
Thank´s for your help, I already recived these manual from you
;
Thank you for your manual It has the basic things to and i use the Oszi for Longer Time.
THX
Model
RTl8DK
and RTl8HD
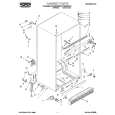
The meat drawer and cover can be removed for cleaning or moved to another shelf, if desired. Remove the meat drawer first.
To remove the meat drawer: 1. Slide the drawer straight out to the stop.
2. Lift the front. 3. Slide drawer out the rest of the way. 4. Replace in reverse order.
Lift the front, then the back.
To remove the cover: 1. Remove the meat drawer.
2. Tilt front of cover up. 3. Pull cover up and out.
To replace the cover: 1. Fit bottom notches of cover over rear and
center cross bars of shelf.
2. Lower cover into place. 3. Replace the meat drawer.
Pull out tx stop, lift the front and pull again.
Removing
the crispers
and crisper
cover
Pull out to the
To remove the crispers: 1. Slide the crisper straight out to the stop.
2. Lii the front. 3. Slide out the rest of the way. 4. Replace in reverse order.
To remove the cover: 1. For some models: Push up glass insert
from the bottom, then slide it out with both hands. 2. Lift front of cover frame. 3. Pull cover frame up and out. 4. Remove metal cover support.
Remove the Lift front of
To replace the cover: 1. Replace metal cover support on wall
supports in front section of cabinet. 2. Fit back corners of cover frame into notch supports on walls of refrigerator, then lower front onto metal cover support. 3. For some models: Slide back of glass insert into cover frame. Then lower front to level position. 12
|
|
|
> |
|