|
|
|
Categories
|
|
Information
|
|
Featured Product
|
|
|
 |
|
|
There are currently no product reviews.
 ;
The manuel was exactly what I needed and I received it promptly. Thanks
;
Thanks to Owner-Manuals.com! This manual was exactly what I needed. As Amana was purchased by Maytag and later by Whirlpool, there was no way to receive it from their websites. I was lucky to find this resource.
 ;
Great to be able to set channels again, on an old but stoll fine working TV
;
Good quality instructions manual. Very useful to me. Quick and excellent service from Owner-Manuals... Thanks !!!
;
Sono molto soddisfatto e, quando mi necessiterà, mi avvarrò nuovamente di questo servizio!
Changing the light bulbs
ElectrlcalshockHaxard Unplug the Mgerator 01 disconnect the main electric power supply to the refrigerator before changing a bulb.Failumtoclouoamldresu.ltin elecrrical shock or injury.
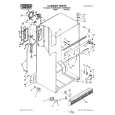
Removing the base grille
M
Optional automatic ice maker
If you have the automatic ice maker accessory (Part No. ECKMF-90) or if you plan to you willlater, there are a few things add it want to know: . Connect the ice maker to the water supply before tumlng it on.
. The ON/OFF lever is a wire signal
To remove grille:
1. Open freezer door. 2. PuIl grille out 3. Do not remove Tech Sheet fastened behind grille.
To replace grille: To change refxigerator light:
1. Disconnect refrigerator from power supply. 2. Reach behind control console to fmd bulbs. 3. Remove bulb and replace with a 40-watt appliance bulb. 4. Reconnect power supply. 1. Line up grille support tabs with metal clips. 2. Push firmly to snap into place. 3. Close the door. See cleaning instructions for defrost pan and condenser coils on page 6.
Reversing the door swing
You can change the hinges on your refrigerator so the doors open the other way. Refer to the instruction sheet included with your refrigerator.
Ice cube trays
Remove ice by slightly twisting the tray with both hands.
To change freezer light:
1. Disconnect refrigerator from power supply. 2. Push in sides of light shield until it snaps free. 3. Replace bulb with a 25-watt appliance bulb. 4. Snap light shield into place. 5. Reconnect power supply. NOTE: Not all commercial appliance bulbs will fit your refrigerator. Be sure to replace a bulb with one of the same size and shape. NOTE: The longer ice cubes are stored, the smaller they get. Slow evaporation is caused by the movement of cold air.
arm. Lower signal arm to make ice. Raise signal arm to turn off the ice maker. . Freezer must be cold enough for the ice maker to work. This may take eight hours or more before the correct temperature is reached . �First� ice may be discolored or offflavored because of new plumbing connections. Throw away first few batches of ice. . Change ice cube size with the dial or lever on the side of the ice maker. . Ice crescents are normally attached at the comer. They break apart easily. . Normal sounds include water tuning when the ice maker is working and the thud of ice as it falls into the bin. . If ice is not being made fast enough and more ice is needed, turn the Refrigerator Control to a higher number. Wait 24 hours, and if this does not increase the ice supply, turn the Freezer Control to C. . Raise the signal arm before you remove the ice bin. When you replace the bin, push it in all the way. Then lower the arm to the ON position. . Cubes left in the bin for long periods of time may develop an offflavor, like stale water. Throw old cubes away. Ice maker will make new ice. Cubes may also become smaller if stored for a long time. . Good water quality is important for good ice quality. It is not recommended that you connect the ice maker to a softened water supply. If a softened water supply cannot be avoided, it is important to maintain the water softener so it operates properly. Water softener chemicals, such as salt from a malfunctioning softener, can damage the ice maker mold and lead to poor ice quality.
Page 6
|
|
|
> |
|