|
|
|
Categories
|
|
Information
|
|
Featured Product
|
|
|
 |
|
|
There are currently no product reviews.
 ;
Perfect quality, highly appreciated service !!!
Fast delivery of the download info, no issues at all. Recommended E-manual shop !!!
;
hi owners manual- crew,
i am very satisfied about the trade with you.
if i need some other manuals, i will contact you again.
thanks
frank kappler
;
Full Panasonic service Manual, as described, no problems
;
This place is amazing. Got our manual in a few hours. Print quality is excellent. Even the manufacturer didn't have this manual. The price was excellent. How many more stars can I give them? More than satisfied.
;
This was a very hard to find manual. The unit is long discontinued and Pioneer doesn't retain every manual for every model. Thanks owner's-manual.com!
Audio Mode
R
Handling Precautions
Do not drop or apply shock to the unit. It may get permanently damaged. Keep the unit away from water and moisture, direct sun and heat, and excessive dust. Never use scouring pads, steel wool, abrasive powders or harsh chemical agents, such as lye solution, for cleaning. Clean with a soft, lint-free cloth or cotton swab slightly dampened with a mild solution of detergent and water. Do not operate this unit in a manner that could distract you from driving safety.
RUE-4165
Remote Control Unit
1 2 3 4 5 6 7 8 9 ! "
Owner's Manual
1 2
DN
!
VOL
VO L UP
ENT
3
# $ % & ( )
Remote Control Signal Transmitter Signal Transmitter Indicator NAVI/AUDIO Switch LIST Button BAND Button MUTE Button DEFEAT Button CHG (Changer) Button V.SEL (Video Selector) Button Volume Control Joystick/:/J Button Radio mode: Preset Selection ( ) SEEK DN/UP ( ) CD/MD Player/CD Changer mode: Disc Selection ( ) Music Sensor ( ) Tape mode: Program Sensor ( ) REW/FF ( ) Equalizer/Surround mode: After calling Equalizer/Surround mode with the A.PROC button, tilt the Joystick ( ) to select a desired item. DISP Button SOURCE Button A.PROC (Audio Processor) Button TUNER Button DISC Button POWER Button
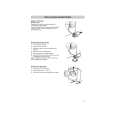
Battery Replacement
Applicable battery: Use two "AA" sized dry batteries or equivalent.
1
2
�
3
+ + �
Opening the battery cover. Push on the cover and slide it as indicated by the arrows then the cover will be removed. Replacing the battery. Remove the old batteries. Insert new ones matching the (+) and (�) polarities as shown in the diagram inside the remote control. Closing the cover. Push the cover in the arrow direction until a click is heard.
" # $ % & ( )
DISP
LIST
4 5 6 7 8 9
~ Numeric Keypad + OK Button , DEL Button Note: Depending on the head unit, some operations cannot be performed. For details, see the Owner's Manual for the head unit.
SOURCE
MENU
BAND
CANC.
A.PROC
DEFEAT
MUTE
In Case of Difficulty
Specifications
Battery Type ......................................... AA size batteries Battery Quantity ............................................................ 2 Dimensions (W � H � D) .................... 45 � 45 � 135 mm (1-3/4" � 1-3/4" � 5-1/4") Weight (without battery) ............................. 70 gr (2.5 oz)
VOICE LIST TUNER
N/H DETOUR DISC
MP/RG PLAN CHG
Navigation Mode
1 2 3 4 5 6 7 8 9 ! " # $ % & ( ) ~ + , Remote Control Signal Transmitter Signal Transmitter Indicator NAVI/AUDIO Switch (Zoom/Wide) Button CANC. (Cancel) Button MP/RG (Map/Route Guidance) Button N/H Button PLAN Button DEL DEST. Button Rotary Encoder Joystick/ENT (Enter) Button (Zoom/Detail) Button MENU Button VOICE Button LIST Button DETOUR Button DISP (Display) Button Numeric Keypad OK Button DEL Button
Problem Remote Control Inoperative.
Cause Reverse placement of battery. Dead battery.
Solution Place the battery correctly into its cradle in the compartment. Replace the battery with a new one.
POWER
V.SEL
DISP ON/OFF
DEL DEST.
(When the flip cover is open)
Remote Control not Point the remote control pointed toward the directly toward your head head unit. unit.
1 4 7
2 5 8 0
3 6 9 OK
~
R
,
DEL
+
ALPINE ELECTRONICS, INC. Tokyo office: 1-1-8 Nishi Gotanda, Shinagawa-ku, Tokyo 141-8501, Japan Tel.: (03) 3494-1101 ALPINE ELECTRONICS OF AMERICA, INC. 19145 Gramercy Place, Torrance, California 90501, U.S.A. Tel.: 1-800-ALPINE-1 (1-800-257-4631) ALPINE ELECTRONICS OF CANADA, INC. Suite 203, 7300 Warden Ave. Markham, Ontario L3R 9Z6, Canada Tel.: 1-800-ALPINE-1 (1-800-257-4631)
Note: Depending on the navigation system, some operations are inoperative. For details, consult your Alpine dealer.
L
Installation of Remote Control Holder
� If direct sunlight reaches the remote control mounted on the holder, remove the remote control from the holder and put it in the glove compartment. � If double-sided adhesive tape cannot install the holder securely, use screws.
Reinforcing Screws
Remote Control
Remote Control Holder Double-Sided Adhesive Tape (Before attaching the tape, remove dust from the surface of attaching place.)
ALPINE ELECTRONICS OF AUSTRALIA PTY. LTD. ALPINE ELECTRONICS FRANCE S.A.R.L. 6-8 Fiveways Boulevarde Keysborough, (RCS PONTOISE B 338 101 280) Victoria 3173, Australia 98, Rue De La Belle Etoile, Z.I. Paris Nord Il Tel.: (03) 9769-0000 B.P. 50016 F-95945, Roissy, Charles De Gaulle Cedex, France ALPINE ELECTRONICS GmbH Tel.: 01-48 63 89 89 Kreuzerkamp 7-11 40878 Ratingen, Germany Tel.: 02102-45 50 ALPINE ELECTRONICS OF U.K., LTD. 13 Tanners Drive, Blakelands, ALPINE ITALIA S.p.A. Milton Keynes MK14 5BU, U.K. Via C. Colombo 8, 20090 Trezzano Sul Tel.: 01908-61 15 56 Naviglio MI, Italy Tel.: 02-48 47 81 ALPINE ELECTRONICS DE ESPA�A, S.A. Portal De Gamarra 36, Pabellón 32 01013 Vitoria (Alava)-Apdo. 133, Spain Tel.: 34-45-283588 68P20877Y33-O Printed in Japan (Y)
Note: Attach the blue protective paper side of double-sided tape onto the console box, etc.
Blue Protective Paper
Console Box etc.
|
|
|
> |
|