|
|
|
Categories
|
|
Information
|
|
Featured Product
|
|
|
 |
|
|
There are currently no product reviews.
 ;
manual de usuario perfecto y completo de buena calidad de impresion y muy detallado ideal !
 ;
It`s full copy of a service manual from url http://www.philips.owner-manuals.com/PM3216-service-manual-PHILIPS.html
;
perfect! you just sent to me the copy in Italian witout even my specification!!!! so you are really smart cooperative and efficient. To my opinion the best place all over to get a manual of electronics!!!!
;
Well Well Well!!!! Good manual perfect for my hobby!!! As Before you have done a very well done work!!!! Thank you
;
Super nice! Good to have a manual in digital format.
Using
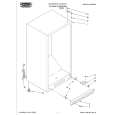
the drain
system
(on some
models)
II Ill1 I
The freezer�s drain system consists of: l drain cap and sleeve (at the liner and cabinet bottom); and l drain hose. The drain hose carries defrost water out of the freezer, and through the area behind the base grille, into a customer provided pan for disposal. NOTE: The drain cap must be removed before defrosting the freezer, and replaced securely afterward.
Changing
the light
bulb
(on some
models)
Electrical Shock Hazard Before removing the light bulb, either turn ~Temperature Control to OFF and unplug the freezer, or disconnect the electricity leading to the freezer at the main power supply. 1Shock and injury can occur if electricity 1remains connected. To replace interior light: 1. Turn Temperature Control to OFF and disconnect freezer from power supply. NOTE: Turning Temperature Control to OFF does not disconnect power to the freezer. 2. Remove the light shield by squeezing sides slightly and pulling out. 3. Replace bulb with 15-watt appliance bulb. 4. Replace light shield. Insert back tabs into slots and squeeze shield slightly to insert front tabs into slots. 5. Reconnect freezer to power supply and refer to �Setting the temperature control� on page 7.
Light shield
Using
the key eject
lock
(on some
models)
If your freezer is equipped with a lock, it can help reduce the hazard of child entrapment. To lock or unlock the freezer, you must hold the key in the lock while turning. The lock is spring loaded, so the key cannot be left in the lock. If the key is lost, contact your Roper dealer for a replacement. Always give the complete model and serial number of your freezer when requesting a replacement key.
9
|
|
|
> |
|