|
There are currently no product reviews.
 ;
I purchased a copy of my old JVC VCR Service manual from Owner-Manuals.com
The copy was complete and valuable to me.
I was able to fix my VCR - it had a bad belt.
I am glad I found Owner-Manuals.com
Great Price. Thanks
;
Great service! I got manual to my sony receiver for very reasonoble price.
;
Good service, well organized. Cheap, and the service manual was as expected. A valuable service for those of us wanting to keep the old junk going!
;
The manual arrived very quickly and had all the information I needed - Very satisfied with this seller. - Thanks -
;
Good quality, the manual help me to repair the echo/reverb section
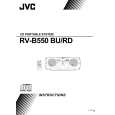
RV-B550BU <Front Cabinet Assembly> Removing the LED boards (See Fig.20)
Prior to performing the following procedure, remove the front cabinet assembly and the rear cabinet assembly. 1. Remove the two screws N and two screws O attaching the LED boards on the speaker. 2. Disconnect the harness from connector FW251 and FW261. N
Speaker Speaker FW261
P
FW251
Q
P
O
Removing the speakers (See Fig.20)
Prior to performing the following procedure, remove the front cabinet assembly and the rear cabinet assembly. 1. Remove the eight screws P attaching the right and left speakers on the inside of the front cabinet assembly. 2. Remove the screw Q attaching the speaker terminal.
P
LED board LED board Speaker terminal
P
Fig.20
1-11
|