|
|
|
Categories
|
|
Information
|
|
Featured Product
|
|
|
 |
|
|
There are currently no product reviews.
 ;
Very fast, clear and usefull site !
Also this Service Manual are very well maked and with a very good definition !
Very fast download speed !
Recomended Seller !
;
The manual you sent me was excellent. It included clear, readable diagrams and a usable parts list. I would surely use your service again. Thanks
;
Payments were processed quickly and items were exactly as described. I will use owner-manuals.com in the future for any other manual needs.
;
The Technics manual was very clear and I was able to solve my technical problems.
I did not think that anyone kept these manuals and was pleasantly surprised to find them on the Internet and at an affordable price.
I would recommend Owner Manuals as a first source of technical products for ‘dated’ equipment manuals.
Ian
;
The content of the manual was not found on the Internet and was a hard find. I check the net for 5 hours until I came across this web-site. When I did find the book it Auto loaded into my IPAD PDF shelf for books for review at anytime. Overall I am satisfied with the book and it answered all my questions. This repair book is obsolete because the product I bout it for is pretty old. Thanks for the help with the download and even having the manual. Thanks 73's K5HRD
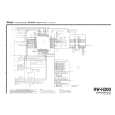
2 ADJUSTMENTS AND CHECKS
調��確�
2-1 Test Mode
In Standby mode, press and hold the stop + play + pause keys simultaneously for 5 seconds. The display will show the model name and the system controller�s version number, and the test mode is initiated. Press the stop key to exit from the test mode and return to the standby mode.
2-1 ������
ã�¹ã�¿ã�³ã��ã�¤ã�¢ã�¼ã��ã�®ç�¶æ��ã�§ã��stop ã�ã�¼ï¼� play ã�ã�¼ï¼� pause ã� ã�¼ã��5ç§�é��æ�¼ã��ç¶�ã��ã��ã�¨ã��表示é�¨ã�«æ©�種å��ã�¨ã�·ã�¹ã�³ã�³ã�® Version No. ã��表示ã��ã��ã��ã�¹ã��ã�¢ã�¼ã��ã�«å�¥ã��ã�� stop ã�ã�¼ã��æ�¼ã��ã�¨ã��ã��ã�¹ã��ã�¢ã�¼ã��ã�¯çµ�äº�ã��ã�¹ã�¿ã�³ã��ã�¤ã�¢ã�¼ã��ã�« æ�»ã��ã��
2-1-1 Front key check
1. Press the play key to enter the front key check mode. 2. The display shows the name of each key to be checked; press the corresponding key. When the check result of the key is OK, the display shows another key name. When the result is No Good, the display continues to show the same key name. 3. When all of the keys have been checked, the display shows "dial50". Check the multi jog dial to confirm that the displayed figure increases when the dial is rotated clockwise and decreases when it is rotated counterclockwise. 4. Press the play key to exit from the front key check mode and return to the Version number display mode.
2-1-1 ã��ã�ã�³ã��ã�ã�¼ã��ã�§ã��ã�¯
1. play ã�ã�¼ã��æ�¼ã��ã��ã��ã�ã�³ã��ã�ã�¼ã��ã�§ã��ã�¯ã�¢ã�¼ã��ã�«å�¥ã��ã�� 2. 表示é�¨ã�«ã��ã�§ã��ã�¯ã��ã��ã�ã�¼ã�®å��称ã��表示ã��ã��ã��ã�®ã�§ã��ã��ã�®ã� ã�¼ã��æ�¼ã��ã�� ã��ã�§ã��ã�¯OKã�ªã��次ã�®ã�ã�¼ã�®å��称ã��表示ã��ã��ã��NGã�ªã��表示ã�¯ å¤�å��ã��ã�ªã��ã�� 3. ä¸�é��ã��ã�ã�¼ã�®ç¢ºèª�ã��çµ�äº�ã��ã��ã�¨ã�� ã��ã�£ã�¹ã��ã�¬ã�¤ã�« â��dial50â�� ã�¨è¡¨ç¤ºã��ã��ã��ã��multi jog ã��å��ã��ã��表示ã�®æ�°å�ã��å�³å��ã��ã�§å¢�å� ã�� å·¦å��ã��ã�§æ¸�å°�ã��ã��ã��ã�¨ã��確èª�ã��ã��ã�� 4. play ã�ã�¼ã��æ�¼ã��ã�¨ã��ã��ã�ã�³ã��ã�ã�¼ã��ã�§ã��ã�¯ã�¢ã�¼ã��ã��çµ�äº�ã�� Version No. 表示ã�«æ�»ã��ã��
2-1-2 Display check
1. Press the display key to enter the display check mode. 2. Press display key a few times and ensure that each press lights the display blocks one after another. 3. When all the indicators are lit, press the display key to exit from the display check mode and return to the Version number display mode.
2-1-2 ����������
1. display ã�ã�¼ã��æ�¼ã��ã��ã��ã�£ã�¹ã��ã�¬ã�¤ã��ã�§ã��ã�¯ã�¢ã�¼ã��ã�«å�¥ã��ã�� 2. display ã�ã�¼ã��æ�¼ã��ã��ã�³ã�«ã��表示é�¨ã��ã��ã�ã��ã�¯ã��ã�¨ã�«ç�¹ç�¯ã�� ã�¦è¡�ã��ã��ã�¨ã��確èª�ã��ã��ã�� 3. 表示é�¨ã��å�¨ç�¹ç�¯ã��ã��ç�¶æ��ã��ã�� display ã�ã�¼ã��æ�¼ã��ã�¨ã��ã��ã�£ã�¹ ã��ã�¬ã�¤ã��ã�§ã��ã�¯ã�¢ã�¼ã��ã��çµ�äº�ã�� Version No. 表示ã�«æ�»ã��ã��
2-1-3 EEPROM default setting
1. Press the erase key. This writes the default values in the EEPROM and checks the written data. When the default data is written correctly, the display shows �EEPROM OK !!�. If not, it shows �EEPROM NG !!�. 2. Press the erase key again to return to the Version number display mode.
2-1-3 EEPROM ã��ã��ã�©ã�«ã��è¨å®�
1. erase ã�ã�¼ã��æ�¼ã��ã�� EEPROMã�«ã��ã��ã�©ã�«ã��å�¤ã��æ�¸ã��è¾¼ã�¿ã��è�ªå��ç��ã�«æ�¸ã��è¾¼ã�¿ã��ã�§ ã��ã�¯ã��è¡�ã��ã��ã��ã�®ã�¨ã��ã��æ£ã��ã��æ�¸ã��è¾¼ã��ã�¦ã��ã��ã�°ã��表示é�¨ã�« â��EEPROM OK !!â�� ã�¨è¡¨ç¤ºã��ã��ã��ä¸�è�¯ã�®å ´å��ã�¯ â��EEPROM NG !!â�� ã�¨è¡¨ç¤ºã��ã��ã��ã�� 2. å��度 erase ã�ã�¼ã��æ�¼ã��ã�¨ã��Version No. 表示ã�«æ�»ã��ã��
2-1-4 Total recording time display
1. When the record key is pressed, the display shows the time in which the pickup outputs the recording power (in the unit of hour). 2. Press the record key again to return to the Version number display mode.
2-1-4 ������表示
1. record ã�ã�¼ã��æ�¼ã��ã�¨ã��ã��ã��ã�¯ã�¢ã��ã��ã��è¨�é�²ã��ã�¯ã�¼ã��å�ºå��ã��ã�� æ��é��ã��表示ã��ã��ã�� ï¼�å��ä½�ï¼�hourï¼� 2. å��度 record ã�ã�¼ã��æ�¼ã��ã�¨ã��Version No. 表示ã�«æ�»ã��ã��
�3�
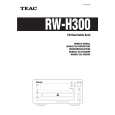 $4.99 RWH300 TEAC
Owner's Manual Complete owner's manual in digital format. The manual will be available for download as PDF file aft…
|
|
|
> |
|