|
|
|
Categories
|
|
Information
|
|
Featured Product
|
|
|
 |
|
|
There are currently no product reviews.
 ;
Perfect source for service manuals: fast and professional transaction; high quality, perfect readable and largely scaleable PDF; complete schemes, diagrams and spare part list. Tnx a lot, cu again!!!!
;
I got your link from a friend and I must say that I am really satisfied with your service. Specially this B&O manual I didn't find anywhere on the web... but you could deliver it :-) . You deliver very fast and the copy is of good quality. So your webpage is bookmarked. Thanks
;
This was the Sony CCU-500A Service manual I was looking for.
The price was reasonable.
The permission to download was quck.
I will use Owner-Manual.com for all my manual needs.
;
Excellent printing quality.
A complete and very usefull service manual with all details.
GREAT SERVICE AT VERY LOW PRICE!
A+++++++++++++++++++++++++
;
Excellent printing quality.
A complete and very usefull service manual with all details.
GREAT SERVICE AT VERY LOW PRICE!
A+++++++++++++++++++++++++
2.9
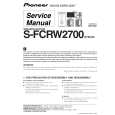
Removing the heat sink (See Figs.10 and 11)
� Prior to performing the following procedures, remove the top cover and main board. (1) From the reverse side of the main board, remove the two screws P attaching the main board to the heat sink. (See Fig.10.) (2) Disconnect the connectors (CN701-CN706) on the main board, remove the main board. (See Fig.10.) (3) Remove the twelve screws Q attaching the heat sink. (See Fig.11.)
Heat sink
Main board
P
P
CN706 CN703 CN701 CN702 CN704 Fig.10 CN705
Heat sink
Q
Q
Fig.11 2.10 emoving the center board, surround back board, front amp. boards (L/R) and rear amp. boards (L/R) (See Figs.10 and 12) � Prior to performing the following procedures, remove the top cover and main board. (1) From the reverse side of the main board, remove the two screws P attaching the main board to the heat sink. (See Fig.10.) (2) Disconnect the connectors (CN701-CN706) on the main board, remove the main board. (See Fig.10.) (3) Remove the two screws Q attaching the center board. (See Fig.12.) (4) Remove the two screws Q attaching the front board(L). (See Fig.12.) (5) Remove the two screws Q attaching the surround back board. (See Fig.12.) (6) Remove the two screws Q attaching the front board(R). (See Fig.12.) (7) Remove the two screws Q attaching the surround board(L). (See Fig.12.) (8) Remove the two screws Q attaching the surround board(R). (See Fig.12.)
Front board(R)
Front board(L)
Q
Q
Q
Q
Q
Q
Surround board(R)
Surround board Surround board(L) Center board Fig.12
1-8 (No.22058)
|
|
|
> |
|