|
|
|
Categories
|
|
Information
|
|
Featured Product
|
|
|
 |
|
|
There are currently no product reviews.
 ;
VERY GOOD SERVICE.FAST ANS VERY HONEST PRICE .RHAANK HERNAN
 ;
Thanks to this service manual I repaired my old camcorder! The manual perfectly explains how to disassemble the camcorder step by step.
;
This manual is very useful because it presents the technical specifications of the cd player, including the manufacturer of the reader, this helps if you need to replace it. It also displays the settings and layout of the circuit.
;
Manual was a good representation of service infomation for the EWV404. It worked well for my repair.
;
Great quality copy, right what I was looking for, all I need to fix my radio.
Thanks
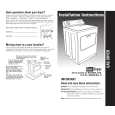
RXD-951/A700/A900/V616/V818/V919
DISASSEMBLY FOR REPAIR
1. How to remove the front panel.
(1) Turn the power ON and then push the open/close key to open the tray. (2) After removed the tray cover, push the open/close key to close the tray and then turn the power OFF. (3) Remove the push rivet (1) and 4 screws (2, 3). (4) The front panel can be separated by removing the 3 screws (4) located at the bottom plate of the front panel.
6 x2 6 7 6 3 3 3 2 1
2. How to remove the CD mechanism
(1) Remove 4 screws (5) on the left side/right side of chassis. (2) Remove 4 screws (6) and the cap (7) on the rear panel. (3) Disengage the CD mechanism as FIG.2. (4) Connect the GND plate of X32 PCB and the chassis with a alligator clip wire (8).
5 x4 4 x3
Fig.1
3. How to remove the mult control knob.
� Remove the knob by string (9).
4. How to open the tray if not comes out.
(1) From the rear side of the CD mechanism, use a screw driver or the like to turn the friction arm fully counterclockwise. (2) Pull out the tray front wards by hand when the tray comes just out. * As for details of items in the below, refer to RXD-F3 service manual (B51-5091-00). (1) How to detach the tray. (2) How to attach the tray. (3) Replacing the pickup.
8
REAR SIDE Friction Arm
9
Fig.2
4
|
|
|
> |
|