|
|
|
Categories
|
|
Information
|
|
Featured Product
|
|
|
 |
|
|
There are currently no product reviews.
 ;
I thank Owen-Manuals.com for the wonderful service rendered to me, and this manual which I purchased helped me a lot in servicing my Denon System, which was lying in a dead state.
Thanks Owner-Manual.com
;
I purchased this manual to repair my Teac set and with the support of this manual I rectified the problem.
Thanks Owner-Manuals.com
;
Excellent service manual, i didn't believe i could find it for such old product, it is very explanatory, managed to fix the disk player!!!
 ;
Nice manual. Clear copy and very rare, to boot. Great price, too!
;
Excellent service manual. Complete service info. with schematics, step-by-step instructions and illustrations. Well worth the price!
ORDER NO.
RRV2043
SPEAKER SYSTEM
S-A660
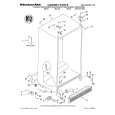
FOR PRECAUTION OF REASSEMBLY AND DISASSEMBLY
The cosmetic baffle is attached to the baffle by its bosses and press-fitting. To detach it, pry it open by inserting a flat blade screwdriver into the cosmetic baffle lower side. Be careful not to damage the cosmetic baffle and cabinet in this case. The woofer is attached to the baffle by 4 external screws. To detach it, first remove the cosmetic baffle. Next unfasten those screws. Then remove the woofer. When attaching it, face its terminal downward. The tweeter is attached to the spacer by inserting. To detach it, first remove the cosmetic baffle. Next pull it off the baffle. Then remove the tweeter. When attaching it, insert the tweeter in the baffle.
XE
This product is component of system. For the operating instructions, refer to the service manual RRV2047 for XR-A660.
The midrange, together with the spacer, is attached to the baffle by 2 external screws. To detach it, first remove the cosmetic baffle. Next unfasten those screws and pull the midrange off. Then remove the midrange. When attaching it, first fit the boss into the hollow on the baffle. (The left one, face its terminal lower right. Then the right one, face its terminal lower left.) Then fasten the midrange.
PIONEER ELECTRONIC CORPORATION
4-1, Meguro 1-Chome, Meguro-ku, Tokyo 153-8654, Japan PIONEER ELECTRONICS SERVICE, INC. P.O. Box 1760, Long Beach, CA 90801-1760, U.S.A. PIONEER ELECTRONIC (EUROPE) N.V. Haven 1087, Keetberglaan 1, 9120 Melsele, Belgium PIONEER ELECTRONICS ASIACENTRE PTE. LTD. 253 Alexandra Road, #04-01, Singapore 159936
PIONEER ELECTRONIC CORPORATION 1998
T-ZZW OCT. 1998 Printed in Japan
|
|
|
> |
|