|
|
|
Categories
|
|
Information
|
|
Featured Product
|
|
|
 |
|
|
There are currently no product reviews.
 ;
Delivery came quite promptly and in a very readable format. Thank you.
;
I found my Clarion VRX8370R in the Camper I bought and I wasn't able for month to understand it.
The Owner Manual was perfect and just what I was searching for.
Thank you.
Leonardo
;
Very good copy of Manual, clear and easy to print off, arrived very promptly and reasonably priced.
Thanks, I will use you again.
;
Zeer duidelijke afdrukken op A4-formaat , zeer uitgebreide handleiding . Pluspunt ,zeer snelle
respons van jullie , binnen de 24h . Top !!!
;
I AM HIGHLY IMPRESSED BY THE EASE OF USE OF THIS DOWNLOAD SERVICE. INSTRUCTIONS ARE CLEAR AND SIMPLE TO FOLLOW....EVEN BY TECHNOPHOBES SUCH AS MYSELF. THE EMAILS POINT YOU IN THE RIGHT DIRECTION...ITS SO EASY PEASY. THE DOWNLOAD CHOICE OF USER MANUALS IS EXTENSIVE AND I COULD NOT FIND A CHEAPER OR MORE EFFICIENT SERVICE ON THE INTERNET. I COULD NOT HAVE MADE A BETTER CHOICE OF INFORMATION PROVIDER. SHOULD I EVER NEED ANOTHER USER MANUAL, THEN THIS IS THE FIRST CHOICE SITE. COULD NOT BE BETTER PLEASED!!!!!!!...MANY THANXES FROM JIM BURNS
Other speaker setup options
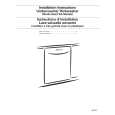
Attaching to a wall
�The wall or pillar on which the speakers are to be attached should be capable of supporting 10 kg (22 Ib.) per screw. Consult a qualified building contractor when attaching the speakers to wall. Improper attachment may result in damage to the wall and speakers. �Do not attempt to attach these speakers to walls using methods other than those described in this manual.
Optional connections
Listening to an external source/ Recording to other equipment
Audio cable (not included) White (L) Red (R)
[Note]
1
Drive a screw (not included) into a wall.
30�35 mm (13/16q�13/8q) �7.5�9.4 mm (19/64q� 3/8q) Wall or pillar 8�11 mm (3/8q� 7/16q)
RF IN
75
Y
DVD
VIDEO OUT
DVD/ VCR
VIDEO IN
EXT
A
FM ANT
PB/CB
RF OUT
LOOP ANT GND
L
LOOP EXT
AM ANT
PR/CR
COMPONENT VIDEO OUT
S-VIDEO OUT
LINE OUT
LINE IN
R
A
B
2
Fit the speaker securely onto the screw(s) with the hole(s).
Center speaker
Front and surround speakers
L R REC IN
150 mm (529/32q)
PLAY OUT
[A] You can record sound from discs, video cassette tapes, or radio, etc., to a tape deck.
1 Discs Press [DVD/VHS] to select �DVD/CD� as the source.
So that the speaker fits up against the wall squarely, be sure to press the speaker cable down into the groove.
Video cassette tapes Press [DVD/VHS] to select �VHS� as the source. Radio Press [FM/AM] to select �FM� or �AM�.
In this position, the speaker will likely fall if moved to the left or right. Move the speaker so the screw is in this position.
2 Start recording and play. Refer to the manual of the other unit for details.
[B] You can playback the sound from a tape deck/laser disc player, etc., through this unit�s speakers.
1 Press [VHS] to put the remote control in VHS mode. 2 Press [DVD/VHS] to select �VHS� as the source. 3 Press [W CH] or [X CH] to select �AU� channel. 4 Start play. When connecting a record player We recommend using a record player with a built-in phono equalizer. If your player doesn�t have a built-in equalizer, connect it first to a separate equalizer and then to the unit.
Fitting speaker stands (not included)
Ensure the stands meet these conditions before purchasing them. Observe the diameter and length of the screws and the distance between screws as shown in the diagram. �The stands must be able to support over 10 kg (22 lb.). �The stands must be stable even if the speakers are in a high position. e.g. Front and surround speaker 5 mm (13/64q), pitch 0.8 mm (1/32q) 60 mm (223/64q)
Speaker stand (not included) Attach the stands with these holes. Plate thickness plus 7 to 10 mm (plus 9/32q to 25/64q)
RQT7388
47
|
|
|
> |
|