|
|
|
Categories
|
|
Information
|
|
Featured Product
|
|
|
 |
|
|
There are currently no product reviews.
 ;
Fast service, document is OK. Thanks! Searched for it long time.
 ;
I was very pleased with the manual I got for my amateur (ham) radio. Without it I could not figure out how to input and/or change the P/L setting on my radio. It drove me nuts as the radio was essentially useless. That all changed when my manual came. Then it took only minutes and I was done. Now my radio works fine. This is an exceptionally good resource as it's a very easy and user friendly download. Thank you very much! Dziękujemy za!
;
It answered my question, which was how to load the paper. I did notice that the very end of the manual was not visible.
;
The product manual I received was exactly what I was looking for, delivered painlessly at a very fair price. I can't ask for any more than that.
;
Very well done!!!!! congratulations. It was a bit longer than usual the wiating time even if it was on time (in 24 hours).
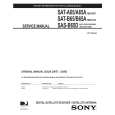
To help you decide whether to include or exclude a certain channel, the title of the program currently airing on that channel appears at the top of the screen. 7. Scroll up or down to view channels and descriptions. Press SELECT to add channels to your list. 8. When you have added all of the channels you want to your list, use the navigation buttons to highlight and SELECT the Exit tab to resume viewing. Once you have created your lists, Use the remote control FAVORITE button to cycle through them quickly and easily. Each press cycles to next channel list. You can also select a list by highlighting the Fav List tab.
FAVORITE LIST Theme Times Fav List Fav Setup Options Ch. Mark Exit Return Wed, Aug 1
Select Favorite List to filter Guide
8:16 PM
All Channels FAV. A FAV. B FAV. C Family
Renaming a channel list:
1. Highlight the Rename button and press SELECT. A Rename List pop-up menu appears. You can rename the first three lists. You cannot rename the All and Family lists. 2. Highlight the list you wish to rename and press SELECT. A buttonboard pop-up panel appears. 3. Highlight the desired letter using the navigation buttons. 4. Press SELECT to enter the letter. 5. When finished, Select OK. 1. SELECT the Auto Set button. A pop-up menu appears showing each of the channel lists. 2. Highlight and SELECT a channel list to be programmed. Once selected, the Auto Set Progress pop-up status panel appears. It may take several minutes for the receiver to scan through all of the channels and determine which ones you are authorized to receive. The results of this scan will be stored in the designated channel list.
Note: Auto Set may exclude some channels such as the Music Choice channels or include some pay per view channels. This does not mean that the receiver is faulty. These channels were excluded or included due to the DIRECTV Receiver�s analysis process. You can manually edit the lists to correct these oversights.
Creating an Auto Set list
Adding and removing all Selecting the Del All menu button clears all channels from the list you have channels chosen. Add All has the opposite effect, creating a list of all the channels you are
authorized to receive.
32
Setting favorites and filters
 $4.99 SAT-A65 SONY
Service Manual Complete service manual in digital format (PDF File). Service manuals usually contains circuit diagr…
|
|
|
> |
|