|
|
|
Categories
|
|
Information
|
|
Featured Product
|
|
|
 |
|
|
There are currently no product reviews.
 ;
Product was very good. Received quickly and complete
 ;
Although printing quality is not the best, the manual was very helpful in order to reactivate this ancient but still good electronic musical instrument.
;
as a first-time user and buyer from this site, i found the overall service outstanding!! this product is a godsend as, without it, i would never have been able to find my way around and use my machine as intended. i will certainly use this site again as required. many many thanx!!
;
This manual is exactly what I needed. This site always has every manual I need, and it is also much less expensive then most other sites. This is the only manual site I will use.
;
Useful manual, good scan, worth the pay if you find the unit difficult to operate.
SCSI ID Setting
The SCSI ID is set by the rotary switch on the rear panel. Press the + or buttons to move the number up or down, respectively. As shipped from the factory, the SCSI ID is set to 0. Press the switch buttons, if necessary, to select the SCSI ID number you require. Precautions � The SCSI ID must be different from IDs of the other peripherals on the SCSI bus. � As shipped from the factory, Term power is ON. A SCSI bus terminator must be connected to the SCSI bus before use. � Before changing the SCSI ID setting, be sure to turn off the power with the POWER switch on the front panel.
Option Switches (DIP Switch)
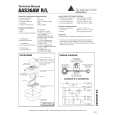
Remove the two slotted screws by using a slotted screwdriver. Remove the access cover to change the DIP switch settings. (Refer to the following figure for details changing the DIP switch settings.) After changing the DIP switch settings, replace access cover and tighten the two slotted screws using a slotted screwdriver. CAUTION Before removing the access cover to change DIP switch settings on the drive, turn off the computer and disconnect the power cord from the unit. Once the DIP switch settings have been changed, replace the access cover using the two original slotted screws provided.
Access Cover
Slotted Screws DIP Switch Figure 2-2. DIP Switch Access
12
Part 2. Preparation
|
|
|
> |
|