|
|
|
Categories
|
|
Information
|
|
Featured Product
|
|
|
 |
|
|
There are currently no product reviews.
 ;
Easy to access. Clear instructions. No problems. Printed fine.
 ;
Great scan but please note that it is entirely in GERMAN.
;
High quality scan of the manual, very quick and easy download and very important, a truly honest price. thanks
;
Minden rendben, de két megjegyzés, az ábrák nehezen kivehetők és a fizetés után 24 órát kell várni a letöltésre.
;
Manual correct, and complete. Downloads cleanly. Format of manual was presumably difficult to PDF to A4, but works reasonably well.
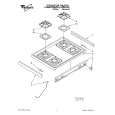
Automatic Oven Timer and Clock
Oven Vents
The lower oven is vented through a duct at the center rear of the range, and the upper oven vent is just above the upper oven door (see page 6). Do not block the openings of these ducts when cooking in the oven - it is important that the flow of hot air from the oven and fresh air to the oven burners be uninterrupted.
Clock
Your range will have one of the clocks illustrated here. Just follow these instructions to set the clock.
Three-Stem Clock (Automatic)
To set the 60-minute timer, just turn the knob in the center of the clock to the left (do not press in on the knob). To bum off the buzzer, turn the knob back to �off�. To set the time of day, push in the knob in the center of the clock and turn to the right. Then release the knob and continue turning until the timer is in the �off� position. The knobs at the right are used to turn the oven on and off automatically.
To set the Clock, push in the center knob of the Minute Timer and turn the knob in either direction to set the digital clock numerals to the correct time. (After setting the clock, let the knob out and turn the Minute Timer pointer to �Off �.)
Automatic Oven Timer: (Lower Oven)
�START�: Push in and turn the Start knob to the time you want the oven to turn itself on. NOTE: If you want the oven to start cooking immediately, do not set the Start time. �STOP�: Push in and turn the Stop knob to the time you want the oven to turn itself off. NOTE: There must be at least a halfhour difference from the Start time to the Stop time for the automatic control to work. Be sure the electric clock is set to the correct time of day, as this controls the automatic timing.
Vent openings and nearby surfaces may become hot. Do not touch them. Handles of pots and pans on the cooktop may become hot if left too close to the vent.
l
l
Do not leave plastic items on the cooktop - they may melt if left too close to the vent.
l
Digital Clock with 60-Minute Timer
The Minute Timer is the large dial to the left of the digital clock. Use it to time all your precise cooking operations. The Minute Timer knob also changes the digital clock. To set the Minute Timer, turn the center knob clockwise, without pushing in, until the pointer reaches the number of minutes you want to time (up to 60). At the end of the set time, a buzzer sounds to tell you time is up. Turn the knob, without pushing in, until the pointer reaches �Off� and the buzzer stops.
Set the Selector Control to the �Time Bake� setting. Set the Temperature Control to the desired cooking temperature. Now the oven will automatically turn itself on at the Start time you set, cook at the temperature you selected and turn itself off at the stop time you set. After you take the food out of the oven, be sure to turn the Temperature Selector Control to �Off �.
Oven Moisture
As your oven heats up, the temperature change of the air in the oven may cause water droplets to form on the door glass. To prevent this, open the oven door for the first minute of oven heat-up to let the moist air out.
|
|
|
> |
|