|
There are currently no product reviews.
 ;
The manual was very helpfull, it answerdes all my questions, and i was surprized to find the original manual on this site! Big thumbs uP:)
 ;
helpful manual.good service.Quick response.will use again
;
Speedy confirmation to my order , with elaborate instructions .
Item Email , received immediately as desired by me.
A Pleasant & Satisfying Transaction.
;
I was searching for this manual at last i got it from this web
;
What can i say but i would have been lost without your support.
Thank You!
-.
-
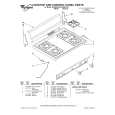
Surface
tions above.
burners
the instruc-
1. Lift up the cooktop, following
2. Before cleaning, remove screws that hold each of the burners in place. The screws prevent the burners from moving during shipment. Remove the shipping screws with a Phillips screwdriver, lift the burner up, tilt it to one side at the end closest to the ignitor and move it toward the back of the range. This separates the burner from the gas valve at the front of the range, so it can be easily removed. 3. Wipe off surface burners with warm, soapy water and a sponge after each use. To remove cooked-on food, soak the burners in a vinegar and water solution for 20-30 minutes. Scrub with a plastic scrubbing pad. 4. If ports are clogged, clean with a straight pin. DO NOT enlarge or distort the ports. DO NOT use a toothpick to clean the ports. 5. Before putting the burners back, dry them thoroughly by setting them in a warm oven for 30 minutes. 6. Replace burners, making sure they are properly seated and level. Replace screws. 7. Occasionally check the burner flames for proper size and shape as shown. A good flame is blue in color. If flames lift off ports, are yellow, or are noisy when turned off, you may need to clean the burners (see above), or call a qualified technician for adjustment.
Typical surface burner flame at the highest setting
19
|