|
There are currently no product reviews.
 ;
excellent quality, contains circuits and scan quality, 226 pages
 ;
Great price for the manual and easy to locate on the site and download. I would buy again.
;
Very good copy of Manual, clear and easy to print off, arrived very promptly and reasonably priced. Thanks, I will use you again
;
The service manual when downloaded and printed out was clear and easy to read. The manual is complete with the schematic diagram and technical data. I occasionally require a manual and now having registered with this company I shall order from them in the future.
;
Great manual, great price. I am very pleased with Owner-Manuals.com, quick service, fast communication. Will definitely use this site again.
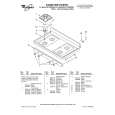
1. Pull the burner cap straight up from the
burner base. 2. Clean the burner cap with warm, soapy water and a sponge. You can also clean it with a mildly abrasive scrubbing pad or cleanser. Do not clean the burner cap in a dishwasher or self-cleaning oven. 3. If the gas tube opening has become soiled or clogged, use a cotton swab or a soft cloth to clean the area. d, clean them with a straight pin. Do not enlarge or distort the port. Do not use a wooden toothpick. If the burner needs to be adjusted, call a qualified technician for service.
5. After cleaning the gas tube opening and ports, Alignment replace the burner cap. To replace the burner cap, make sure the alignment pins on the cap are properly aligned with the burner base.
6. Turn on the burner to see if it will light. If the
burner does not light after you have cleaned it, recheck cap alignment or contact an authorized service technician. Do not service the sealed burner yourself.
20
|