|
|
|
Categories
|
|
Information
|
|
Featured Product
|
|
|
 |
|
|
There are currently no product reviews.
 ;
This manual is very helpfull to use the Power Supply. All technical information has been available.
For service use the circuit diagrams are very good.
Thanks .
;
Very comprehensive document which is a must-have for any Satellit 2100 owner whose set up is somewhat intricate. Due to the bad quality of the pictures that are rather dark and a bit blurred I gave 4-star feedback.
;
The manual was missing 2 pages but when I presented the problem to the company they made every attempt to get the 2 pages to me, when they couldn't they refunded my money. A very pleasing and easy transaction. The manual they provided was the original, it was concise and to the point. I plan to do business with this company again when should the need arise.
 ;
The owners manual is very good. all my how to questions were answered in detail.
;
Irrespectively of this manual exist only germany language, it's useful - although i need some additional task to translate: My english is bad, but usable - but i really dont speak germany. :)
USING YOUR RANGE
ADJUSTING THE OVEN TEMPERATURE CONTROL
Although your new oven is properly adjusted to provide accurate temperatures, it may cook faster or slower than your old oven. If you are not satisfied with the baking/roasting results, you can change the temperature calibration by following the steps below. NOTE: DO NOT measure the oven temperature with a thermometer. Opening the oven door will lower the oven temperature and give you an incorrect reading. Also, the thermometer temperature reading will change as your oven cycles.
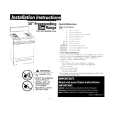
1. Make sure the oven temperature control knob is
turned to the off position. Pull the knob straight off and flip it over.
2. Loosen the locking screws inside the
control knob. Note the position of the notches.
Locking screws
1 NOTCH = 5�F 1 NOTCH = 5�F
Notches
G
COOLER
E
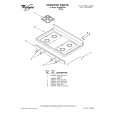
3. Adjust the temperature.
� To lower the temperature, hold the knob
handle firmly and turn the skirt clockwise to move the tooth a notch to the �E� on the �COOLER� arrow. � To raise the temperature, hold the knob handle firmly and turn the skirt counterclockwise to move the tooth a notch to the �E� on the �HOTTER� arrow. Each notch equals about 5°F. To raise Notches
G
OLER CO
Skirt Locking screws
4. Tighten the locking screws and replace the
control knob.
G
COOLER
E
12
1 NOTCH = 5�F
E
E E
HOTTER
HOTTER
G
G
E
HOTTER
To lower Tooth
G
|
|
|
> |
|