|
|
|
Categories
|
|
Information
|
|
Featured Product
|
|
|
 |
|
|
There are currently no product reviews.
 ;
I was very pleased with the manual I got for my amateur (ham) radio. Without it I could not figure out how to input and/or change the P/L setting on my radio. It drove me nuts as the radio was essentially useless. That all changed when my manual came. Then it took only minutes and I was done. Now my radio works fine. This is an exceptionally good resource as it's a very easy and user friendly download. Thank you very much! Dziękujemy za!
 ;
It answered my question, which was how to load the paper. I did notice that the very end of the manual was not visible.
;
The product manual I received was exactly what I was looking for, delivered painlessly at a very fair price. I can't ask for any more than that.
;
Very well done!!!!! congratulations. It was a bit longer than usual the wiating time even if it was on time (in 24 hours).
;
Last week I bought a second hand BAUKNECHT TRK4850 DRYER. It is a professional machine with many programs and switch options. I feared it would be a huge quest to find a manual. I was delighted when I found owner-manuals.com. After payment I received the file to download the next day already. The quality is great. I am very happy. Thanks!
but kindly the distributions of the operating programs not find in the owners manual,can you help me to understand the operating programs instructions thank you
Power failure
COOKTOP USE
Cooktop Controls
In case of prolonged power failure, the surface burners can be lit manually. Hold a lit match near a burner and turn knob counterclockwise to LIGHT. After burner lights, turn knob to setting.
WARNING
REMEMBER: When range is in use or (on some models) during the Self-Cleaning cycle, the entire cooktop area may become hot.
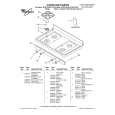
Sealed Surface Burners
1
Fire Hazard Do not let the burner flame extend beyond the edge of the pan. Turn off all controls when not cooking. Failure to follow these instructions can result in death or fire.
Electric ignitors automatically light the surface burners when control knobs are turned to LIGHT. Before setting a control knob, place filled cookware on the grate. Do not operate a burner using empty cookware or while the grate is unoccupied.
2
4
5
3
1. Burner cap 2. Burner base 3. Alignment pins 4. Ignitor 5. Gas tube opening
To Set:
1. Push in and turn knob counterclockwise to LIGHT. All four surface burners will click. Only the burner with the control knob turned to LIGHT will produce a flame. 2. Turn knob anywhere between HIGH and LOW. Use the following chart as a guide when setting heat levels. SETTING LIGHT HIGH RECOMMENDED USE
s s s
Light the burner. Start food cooking. Bring liquid to a boil. Hold a rapid boil. Quickly brown or sear food. Fry or sauté foods. Cook soups, sauces and gravies. Stew or steam foods. Keep food warm. Melt chocolate or butter. Simmer.
IMPORTANT: Do not obstruct the flow of combustion and ventilation air around the burner grate edges. Burner cap: Always keep the burner cap in place when using a surface burner. A clean burner cap will help prevent poor ignition and uneven flames. Always clean the burner cap after a spillover and routinely remove and clean the caps according to the �General Cleaning� section. Gas tube opening: Gas must flow freely throughout the gas tube opening for the burner to light properly. Keep this area free of soil and do not allow spills, food, cleaning agents or any other material to enter the gas tube opening. Protect it from spillovers by always using a burner cap.
BETWEEN HIGH and LOW
s s s s s
1
LOW
s s s
2
1. 1-1¹��" (25-38 mm) 2. Burner ports
Burner ports: Check burner flames occasionally for proper size and shape as shown above. A good flame is blue in color, not yellow. Keep this area free of soil and do not allow spills, food, cleaning agents or any other material to enter the burner ports.
6
|
|
|
> |
|