|
|
|
Categories
|
|
Information
|
|
Featured Product
|
|
|
 |
|
|
There are currently no product reviews.
 ;
This Manual (as downloaded) is both informative and comprehensive and has proved to be extremely useful. thoroughly recommended.
;
everything is ok, thank you very much! Product is good, no problems with download!
;
Great site, I always find all the manuals I need and i can't find anywhere else. PDF for the Sony PCM 3348 is complete and scan is good quality. Thank you!
;
It was a complete manual as stated. Very good source for older product manuals. Thanks
;
Scan quality is very good. Price is very reasonable. If you're looking to purchase a copy of this manual, this is the one to get.
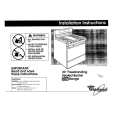
Adjusting
the oven temperature
control
Although your new oven is properly adjusted to provide accurate temperatures, it may cook faster or slower than your old oven. If, after using the oven for a period of time, you are not satisfied with the baking/roasting results, you can change the temperature calibration by following these steps: 1. Make sure the Oven Temperature Control Knob is turned to the off position. Pull knob straight off and flip it over.
2. Loosen the locking screws inside the control knob. Note the position of the notches. 3. To lower the temperature, hold knob handle firmly and turn skirt clockwise to move the tooth a notch to the left. Each notch equals about 10°F (5°C). 4. To raise the temperature, hold knob handle firmly and turn skirt counterclockwise to move the tooth a notch to the right. Each notch equals about 10°F (5°C). 5. Tighten the locking screws and replace the control knob.
Locking screws
h
Notches /
Sk�irt
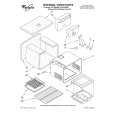
Broiling
1. Position the rack properly before turning on the oven. Position the oven rack so that the surface of the food is at least 3 inches (7 cm) away from the broil burner. See �Broiling rack position chart� on page 17. 2. Put the broiler pan and food on the rack. 3. Completely close the oven door to ensure proper broiling temperatures.
15
|
|
|
> |
|