|
|
|
Categories
|
|
Information
|
|
Featured Product
|
|
|
 |
|
|
There are currently no product reviews.
 ;
Great Manual. This manual is available no where else. It was exactly what I was looking for. Only in German.
 ;
This GRUNDIG UV5A Owner Manual is not only an instruction manual but a total functional circuit description of the Multimeter and includes circuit diagram at the end pages. It is very helpful for repairing and calibrating the instrument. It is written in two languages English and German for international support. It was very easy to repair my unit with this document. Regards, Regis Pauly, Electrical Engineer.
;
The owner's manual was evetything I thought it would be. I was able to print it out using both sides of the paper in quick order, saving me a search online for a used one.
;
Хорошее качество сканирования.
Мануал пришел часов эдак через 12. В целом доволен.
;
Fantastic quality and impressive delivery time. Based on this manual, I recommend this service without hesitation! Five Stars for certain.
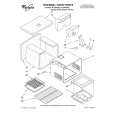
Adjusting
the oven temperature
control
Although your new oven is properly adjusted to provide accurate temperatures, it may cook faster or slower than your old oven. If, after using the oven for a period of time, you are not satisfied with the baking/roasting results, you can change the temperature calibration by following these steps: 1. Make sure the Oven Temperature Control Knob is turned to the off position. Pull knob straight off and flip it over.
2. Loosen the locking screws inside the control knob. Note the position of the notches. 3. To lower the temperature, hold knob handle firmly and turn skirt clockwise to move the tooth a notch to the left. Each notch equals about 10°F (5°C). 4. To raise the temperature, hold knob handle firmly and turn skirt counterclockwise to move the tooth a notch to the right. Each notch equals about 10°F (5°C). 5. Tighten the locking screws and replace the control knob.
Locking screws
h
Notches /
Sk�irt
Broiling
1. Position the rack properly before turning on the oven. Position the oven rack so that the surface of the food is at least 3 inches (7 cm) away from the broil burner. See �Broiling rack position chart� on page 17. 2. Put the broiler pan and food on the rack. 3. Completely close the oven door to ensure proper broiling temperatures.
15
|
|
|
> |
|