|
|
|
Categories
|
|
Information
|
|
Featured Product
|
|
|
 |
|
|
There are currently no product reviews.
 ;
The only reason I gave this less than 4 stars, is because it shouldn't take 24 hrs to have the download available. I was surprised to find that I had to wait until the next day to be able to download the manual that I paid for.
The manual itself is the correct manual.
 ;
Excellent replacement for original Owner´s Manual. I am totally satisfied!
;
Great service. Manual is as advertised and delivered when promised.
;
Perfect quality, highly appreciated service !!!
Fast delivery of the download info, no issues at all. Recommended E-manual shop !!!
;
hi owners manual- crew,
i am very satisfied about the trade with you.
if i need some other manuals, i will contact you again.
thanks
frank kappler
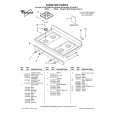
To Clean:
Surface Burners
IMPORTANT: Do not obstruct the flow of combustion and ventilation air around the burner grate edges. Before cleaning, make sure all controls are off and the oven and cooktop are cool. Do not use oven cleaners, bleach or rust removers. Burner cap: Always keep the burner cap in place when using a surface burner. A clean burner cap will help prevent poor ignition and uneven flames. Always clean the burner cap after a spillover and routinely remove and clean the caps according to the �General Cleaning� section.
1. Remove the burner cap from the burner base and clean according to �General Cleaning� section. 2. Clean the gas tube opening with a damp cloth. 3. Clean clogged burner ports with a straight pin as shown. Do not enlarge or distort the port. Do not use a wooden toothpick. If the burner needs to be adjusted, contact a trained repair specialist.
1
4. Replace the burner cap, making sure the alignment pins on the cap are properly aligned with the burner base.
2
4
1
5 3
1. Burner cap 2. Burner base 3. Alignment pins 4. Ignitor 5. Gas tube opening 1. Incorrect 2. Correct
2
5. Turn on the burner. If the burner does not light, check cap alignment. If the burner still does not light, do not service the sealed burner yourself. Contact a trained repair specialist.
Gas tube opening: Gas must flow freely throughout the gas tube opening for the burner to light properly. Keep this area free of soil and do not allow spills, food, cleaning agents or any other material to enter the gas tube opening. Protect it from spillovers by always using a burner cap.
1
2
1. 1-1¹��" (25-38 mm) 2. Burner ports
Burner ports: Check burner flames occasionally for proper size and shape as shown above. A good flame is blue in color, not yellow. Keep this area free of soil and do not allow spills, food, cleaning agents or any other material to enter the burner ports.
7
|
|
|
> |
|