|
|
|
Categories
|
|
Information
|
|
Featured Product
|
|
|
 |
|
|
There are currently no product reviews.
 ;
Please tell us what you think and share your opinions with others. Be sure to focus your comments on the product. You will receive $2.00 of store credit for Your review.
;
Please tell us what you think and share your opinions with others. Be sure to focus your comments on the product. You will receive $2.00 of store credit for Your review.
;
Good copy and great customer service! There was some confusion with my order and it was resolved promptly!
;
Having bought a pre-owned Sony FM stereo tuner through eBay, it came without any manuals. It soon became clear that to get the best from this excellent tuner I needed a decent manual because much of the operation was not intuitive to a newboy to hi fi like me. I managed to download the official Sony multi-lingual manual from Owner-Manuals.com with no problem at all - a really quick and easy service. I'm very glad I did because I found out all the operations of the tuner and was then able to not only set it up quickly but also to get much more from it that poke-and-hope trialling would ever achieve. In my book $4.99 very well spent.
;
This manual is immaculate in it's accuracy. Everything is written very clearly and easy to understand. Written by a professional who wants to convey a clear and easy to understand message!!
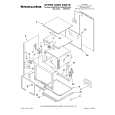
Usirig the Self-Cleaning Cycle
The self-cleaning cycle uses very high heat to burn away soil. Before you start, make sure you understand exactly how to use the cycle safely.
Before You Start 1. Clean the shaded
areas by hand. They do not get hot enough during the Self-Clean cycle for soil to burn away. Use hot water and detergent or a soapy steelwool pad on...
l l
DO NOT clean the fiberglass seal. DO NOT move it or bend It. Poor cleaning and poor baking will result. 2. Remove the broiler pan and any pots or pans you may have stored in the oven. They can�t stand the high heat.
l
the the the the the
frame around the oven. inside of the door, especially part outside the oven seal. first 2-3 inches of oven near door.
3. Wipe
out any loose grease. This will help smoke and possible during the cleaning
soil or reduce flare-ups cycle.
4. If you want the oven racks to remaln shiny, remove them from the oven and clean them by hand. Otherwise, put oven racks on the second and fourth guides (guides are counted from bottom to top). After racks are cleaned in the Self-Cleaning cycle they become harder to slide. See tips on page 20.
DO Clean
Frame -
I DO Clean
Door
DO NOT Clean Seal
Turn on the vent hood or other kitchen vent during the cleaning help remove heat and odors that are normal during the cycle. SPECIAL CAUTIONS: DO NC T use oommerclal oven cleaners In your oven. Damage to the poroelaln flnlsh may occur. DO NOT force the lock lever, you could bend or break lt. The lever Is deslgned to stay locked until the oven Is cool enough to safely open. Walt until lt moves freely. DO NOT use toll or other Ilners In the oven. Durlng the cleaning cycle foil can burn or melt and damage the oven surface.
16
cycle. This will
DO NOT block the vent durlng the cleaning cycle. Alr must move freely for best cleaning
|
|
|
> |
|