|
|
|
Categories
|
|
Information
|
|
Featured Product
|
|
|
 |
|
|
There are currently no product reviews.
 ;
This manual was exactly what i needed and could not find elsewhere. Price is not too high. Great !
;
ecelent I was reciver the service manual soon I fell so happy very complete 100% positive all by this store tanks atte Luis salazar
 ;
A great copy of the manual, and the only one I could find anywhere on the net! The circuit diagrams are easily readable, all component values marked and easy to see. A highly appreciated download!
;
Great Manual. This manual is available no where else. It was exactly what I was looking for.
;
The TEAC A-1500's Service Manual was instrumental in reviving this classic reel-to-reel. Not only does it have the schematics, exploded parts diagram and parts list, it also provided mechanical adjustment information that approximate factory default settings.
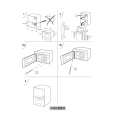
Disassembly
4-6-3 Roll Pinch
1. Before you disassemble the roll pinch, you should remove: � OPE Unit (see page 4-9) 2. Remove the four screws securing the OPE unit.
4-6-4 OPE PBA
1. Before you disassemble the OPE PBA, you should remove: � OPE Unit (see page 4-9) 2. Remove the four screws securing the OPE unit.
3. Turn the upper scan frame of the OPE unit over. 4. Remove the three screws and take out the spring pinch. Then take out the roll pinch.
3. Remove the nine screws and take out the PBA and LCD.
Spring pinch
Upper scan frame
Roll pinch
MC-Service
Samsung Electronics
Notes: � Do not turn the OPE unit upside down after you remove the screws securing the PBA. Keys and rubber contacts may be separated and easily lost. � When you reassemble the OPE unit, make sure the keys are in correct position. � When you reassemble the PBA, secure the screws according in the order of the number printed on the PBA. � After reassembling, operate the machine to make sure it works properly. � After reassembling, make sure the LCD is not blocked.
4-11
|
|
|
> |
|