|
There are currently no product reviews.
 ;
Quick response and exactly what I was looking for and at a great fair price!
;
5 star quality on these downloadable manuals. Easy to read and all the information is there. A must when doing a custom install or needing to service your precious old school electronics.
;
So usefull to make my installation a breeze. 5 stars on quality.
;
very helpful, the information in these manuels are very detailed
;
Please tell us what you think and share your opinions with others. Be sure to focus your comments on the product. You will receive $2.00 of store credit for Your review.
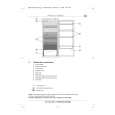
Adjusting the oven temperature control Although you new oven is properly adjusted to provide accurate temperatures, it may cook faster or slower than your old oven. If, after using the oven for a period of time, you are not satisfied with the baking/roasting results, you can change the temperature calibration by following these steps: 1. Turn the Oven Temperature Control Knob to the off position. Pull knob straight off and flip it over so the back matches the illustration in Step 2.
2. Loosen the locking screws. Note the position of the indicator.
Indicator
Knob skirt
Markers
3. To lower the temperature, hold knob handle firmly and turn knob skirt clockwise to move the indicator one marker line to the left. Each line equals about 10°F (5°C). 4. To raise the temperature, hold knob handle firmly and turn knob skirt counterclockwise to move the indicator one marker line to the right. Each line equals about 10°F (5°C). Tighten the locking control knob. screws and replace the
|