|
|
|
Categories
|
|
Information
|
|
Featured Product
|
|
|
 |
|
|
There are currently no product reviews.
 ;
as a first-time user and buyer from this site, i found the overall service outstanding!! this product is a godsend as, without it, i would never have been able to find my way around and use my machine as intended. i will certainly use this site again as required. many many thanx!!
;
This manual is exactly what I needed. This site always has every manual I need, and it is also much less expensive then most other sites. This is the only manual site I will use.
 ;
Useful manual, good scan, worth the pay if you find the unit difficult to operate.
;
Exactly as described, the full user-manual (145 pages). Perfect.
www.pioneerelectronics.com
OPERATING YOUR SYSTEM
Turn on your receiver with the level control initially at zero.
CABINET MAINTENANCE
Use a polishing cloth or dry cloth to wipe off dust and dirt. When the cabinet is very dirty, clean with a soft cloth dipped in some neutral cleanser diluted five or six times with water, and then wipe again with a dry cloth. Do not use furniture wax or cleaners. Never use thinners, benzine, insecticide sprays and other chemicals on or near the cabinets, since these will corrode the surfaces.
IMPORTANT:
Follow the instructions for your receiver and set the speakers to SMALL in the 5.1 mode (Dolby Digital). This will ensure that any bass signals are re-directed to the subwoofer where they will be optimally reproduced. If you have a choice, set the crossover frequency to 150Hz.
Now gradually increase the volume until you reach a comfortable listening level.
WARNING:
UNPLUG THE POWERE D SUBWOOFER BEFORE CLEANING TO REDUCE THE RISK OF ELECTRIC SHOCK
CAUTION:
The speakers are equipped with a protection device to protect the transducers from extreme conditions. Under these conditions the protection device will activate and stop the speaker from producing sound. If this happens shut off the system for 5-10 minutes and allow the protection device to reset.
NON SKID PADS
If the front, center and rear speakers are placed on a hard surface, such as wood or tile place four non skid pads on the bottom surface of the speakers.
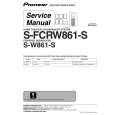
SUBWOOFER REAR SECTION
13
2
LINE LEVEL IN POWER INDICATOR
VOLUME LEVEL
MIN
MAX
If the subwoofer is placed on a hard floor, such as wood or tile, place four non skid pads on the bottom surface of the subwoofer.
Illuminates RED when the power is being supplied.
1 POWER INDICATOR 2 VOLUME LEVEL
Volume of subwoofer is adjusted with this knob. Turn this knob clockwise to raise the level. � Starting with �MIN�, turn this knob and raise the volume slowly. If the unit is turned on with the volume set too high, it could cause hearing and/or speaker damage. Do not turn the volume up excessively high. The low frequency sound is apt to be raised too high since it is less disturbing and harder to detect than high frequencies. Caution must be taken here since the amplifier and speaker will be clipped when the output of the amplifier or receiver is increased with the subwoofer level set to �MAX�.
Connect SUBWOOFER OUTPUT terminal of the receiver to this terminal with the supplied RCA cable.
3 LINE LEVEL IN
5
|
|
|
> |
|