|
|
|
Categories
|
|
Information
|
|
Featured Product
|
|
|
 |
|
|
There are currently no product reviews.
 ;
Good quality instructions manual. Very useful to me. Quick and excellent service from Owner-Manuals... Thanks !!!
;
Sono molto soddisfatto e, quando mi necessiterà, mi avvarrò nuovamente di questo servizio!
;
A comprehensive Operating and Service Manual. All schematics are complete and easy to read. The PCB drawings and complete parts list are very helpful. I would definitely recommend this manual.
;
SCANNING OF HIGH QUALITY
VERY, VERY HIGH VELOCITY DOWNLOAD
VERY GOOD PRICE,
TRUE SATISFIED, THANKS
;
Genuine Toshiba owner's manual. Couldn't really ask for more. And written in understandable English in contrast to a few recent experiences I have had with manuals for other equipment other than Toshiba but made in China and written in "Chinglish"!
Using the oven controls
Baking 1. Position the rack(s) properly before turning on the oven. To change rack position, pull rack out to stop, raise front edge and lift out. The rack(s) should be placed so the top of the food will be centered in the oven. Always leave at least 1 l/2 to 2 inches (4-5 cm) between the sides of the pan and the oven walls and other pans. 2. Set the Oven Temp Control to the baking temperature you want. The oven burner will automatically light in 50-60 seconds. 3. Preheat the oven for 10 minutes. Put food in the oven. NOTE: Do not place food directly on the oven bottom
Locking screws
3. Before the broiler is turned on, place food on broiler pan and position the broiler pan at one of the three levels. Refer to a reliable cookbook for broiling chart. 4. Set the Oven Temp Control to BROIL. The broiler will automatically light in 50-60 seconds. 5. When broiling is done, turn the Oven Temp Control to OFF. NOTE: Do not preheat the broiler before using. Completely close the broiler drawer during broiling.
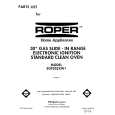
2. Loosen the locking screws. Note the position of the indicator.
I Knob skirt
The oven vent
3. To lower the temperature, hold knob handle firmly and turn knob skirt clockwise to move the indicator one marker line to the left. Each line equals about 10°F (5°C). 4. To raise the temperature, hold knob handle firmly and turn knob skirt counterclockwise to move the indicator one marker line to the right. Each line equals about 10°F (5°C). Tighten the locking screws and replace the control knob. Broiling The Broiler Drawer is located below the oven door. Always broil with the oven door closed.
Hot air and moisture escape from the oven through a vent located at the back of the cooktop. The vent is needed for air circulation. Do not block the vent. Poor baking will result.
4. During baking, the oven burner will turn on and off to maintain the temperature setting. 5. When baking is done, turn the Oven Temp Control to OFF. Adjusting control the oven temperature
Does your oven seem hotter or colder than your old oven? The temperature of your old oven may have shifted gradually without you noticing the change. Your new oven is properly adjusted to provide accurate temperatures. But, when compared to your old oven, the new design may give you different results. If, after using the oven for a period of time, you are not safisfied with the temperature settings, they can be adjusted by following these steps: 1. Pull the broiler drawer open and tilt the door panel down.
Burn Hazard When the oven is ON, pans and pan handles left near the oven vent can become hot enough to bum the user and to melt plastics. Use potholders to move pans. Never store plastics, paper or other items that could melt or burn near the oven vent, or any of the surface burners.
The optional accessory
backguard
An optional backguard accessory can be added to the back of the cooktop. This accessory (Part No. 4315465) is available from your Roper Appliance dealer.
1. Pull the Oven Temperature Control Knob straight off and turn upsidedown,
2. Place broiler pan grid so grease can drain down sides into lower part of broiler pan. See picture.
Page 5
|
|
|
> |
|