|
|
|
Categories
|
|
Information
|
|
Featured Product
|
|
|
 |
|
|
There are currently no product reviews.
 ;
I purchased the unit from a private party and the original owners manual was not available. Having the ability to download it was extremely helpful and clarified operating the equipment immensely. This is a complicated unit and without the manual I would not have been able to maximize it's potential. Thank you.
;
Being a user of older radios of many kinds, preferring them over more modern rigs, this manual was invaluable in the programming of my two. I now know for certain what the assorted buttons functions are, and am very grateful to have found this excellent site. Many thanks for your assistance, Tony.
 ;
Clear and easy to read. All details as expected. Price acceptable , and quick delivery.
;
Quick response and exactly what I was looking for and at a great fair price!
;
5 star quality on these downloadable manuals. Easy to read and all the information is there. A must when doing a custom install or needing to service your precious old school electronics.
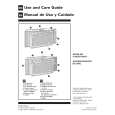
INSTALLATION
1. To ensure adequate ventilation for your refrigerator, it is recommended to provide space of 6cm on both sides and at the back, and space of 9cm above the refrigerator. Insufficient spacing will decrease
148 cm
9cm
6cm
When transporting
Carry the refrigerator by holding the handles located on the rear and bottom.
the cooling efficiency, resulting in unnecessary consumption of electricity. 6cm
6cm
135 cm
2. Using the two front Adjustable feet, ensure that the refrigerator is positioned firmly and level on the floor. 3. Clip Evaporating pan cover (supplied inside the refrigerator compartment) in position in front of the two Adjustable feet.
Evaporating pan cover
NOTE:
� Keep your refrigerator out of direct sunlight. � Do not place next to heat generating appliance. � Do not place directly on the ground. Provide suitable stand.
Adjustable foot
Before using your refrigerator
Clean the inside parts with a cloth soaked in warm water. If soapy water is used, wipe it off thoroughly.
OPERATION
CONTROLLING TEMPERATURES
The refrigerator controls its temperature automatically. However, if needed, adjust the temperature as follows.
Freezer compartment
1 MIN
2
3
MED 4
5
6 7 MAX Coldest
Refrigerator compartment
2
MED 4 3 5 6 MAX 7 Coldest
MIN 1
FREEZER TEMP. CONTROL
REFRIGERATOR TEMP. CONTROL
7(MAX) For making ice rapidly or fast
freezing.
7(MAX)
4(MED) For normal freezing. 1(MIN) When frozen food or ice cream is
not stored.
� If the refrigerator is operated for a long time with FREEZER TEMP. CONTROL set at 7(MAX), foods stored in the refrigerator compartment may also freeze.
For keeping foods fresher tasting. When the refrigerator does not provide sufficient cooling.
4(MED) 1(MIN)
For normal operation.
When the refrigerator provides excessive cooling.
� If the refrigerator is operated for a long time with REFRIGERATOR TEMP. CONTROL set at 7 (MAX), foods stored in the refrigerator compartment may also freeze. � Low ambient temperature may cause placed foods to freeze even if REFRIGERATOR TEMP. CONTROL is set to 1 (MIN).
HINTS WHEN MAKING ICE
1.The included Water supply cup can be used to measure the amount of water to pour into Ice cube trays. Pouring too much water into the tray will result in the ice cubes connecting to each other when frozen.
Amount for both Ice cube trays Amount for one Ice cube tray
2.When the ice cubes are made, turn the lever clockwise to empty the ice into Ice cube box.
Ice cube box
NOTE:
To prevent damage to the Ice cube box, do not make ice in the Ice cube box or pour oil into it.
Lever
9
|
|
|
> |
|