Having purchased a 1994 Kenwood music system from a Charity shop in 2013 (it was a high end product in its day), I found myself not quite knowing where to plug in what, and how to do this, that and the next thing. I needed a Manual, and after failure with another online 'Manual provider' I found Owner Manuals dot com. Well, I wasn't sure, but it was only $5, and if things didn't work out, I wouldn't have lost much...
But things DID work out. After paying my childrens inheritance money, $4.99, I was sent a Manual for my Kenwood System very quickly. Alas, it was in German, and being Scottish, I could not read it or get my system in order from it...a rapid email to them brought the English Manual in short order, and my retro-system was and IS up and running in it's regulation settings.
I am very grateful to http://www.owner-manuals.com for their quick service and for even having such an obsolete Manual in the first place! If you need a Manual for ANYTHING, try here first. I wouldn't be surprised if I bought a 1928 Marconi radio, and got the user Manual for THAT here too!
Top marks.
John Copeland
Glasgow
Scotland
I was so happy that the owner's manual was available. It is well written and helped me to use the radio/CD player/recorder without problems. Thanks for making it available.
Irene Lambert
Thanks so much for the Owner's manual for my Sony PS - FL1. I had purchased the turntable off of eBay. It came in and looked great. Packed well and appeared to be great. I balanced and aligned the tone are and hooked it up. When trying to play a record the tone are would move to the right place and just before it would drop to play it moved back off the edge of the record before touching down. I searched the net for an answer to this issue. No luck. Then I purchased the owners manual and sure enough there was a place to adjust where the stylus touched down. That adjustment solved the problem and saved me a $35 feet to have the player checked out. The manual is well written and easy to understand. It is a must have for anyone with this front loading Sony turntable.
Text excerpt from page 14 (click to view)
Vor Inbetriebnahme
� Das Geräteinnere und alle Ausstattungsteile bitte vor Erstinbetriebnahme reinigen (siehe Abschnitt "Reinigung und Pflege").
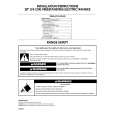
Apply covers (C-D) on joint cover lugs and into hinge holes. Snap vent grille (B) and hinge cover (E) into position.
C D
Inbetriebnahme und Temperaturregelung
� Netzstecker in die Steckdose stecken. Die Innenbeleuchtung leuchtet bei geöffneter Tür. Der Drehknopf für die Temperaturwahl ist im Kühlraum rechts. Stellung �0� bedeutet: aus. Stellung �1� bedeutet: Höchste Innentemperatur (wärmste Einstellung). Stellung �6� (Endanschlag) bedeutet: Tiefste Innentemperatur (kälteste Einstellung). Folgende Einflüsse sind ausschlaggebend für die Innentemperatur: � Umgebungstemperatur; � Menge und Temperatur der eingelagerten Lebensmittel; � Häufiges oder langes �ffnen der Tür. Die Temperaturen im Kühlraum und Gefrierraum lassen sich nicht getrennt regeln. Sollten frische Lebensmittel schnell eingefroren werden, kann Stellung �6� gewählt werden. Achten Sie darauf, da� die Temperatur im Kühlraum nicht unter 0°C absinkt und stellen Sie den Temperaturregler rechtzeitig auf Stellung �3� oder �4� zurück. Wichtig! Hohe Umgebungstemperatur (z. B. an hei�en Sommertagen) und kalte Einstellung des Temperaturreglers (Stellung �5� bis �6�) kann zu Dauerbetrieb des Kompressors führen. In diesem Fall den Temperaturregler auf eine wärmere Einstellung zurückdrehen (Stellung �3� bis �4�). Bei dieser Einstellung wird der Kompressor geregelt und der Abtauvorgang wieder automatisch eingeleitet.
E B
Separate parts Ha, Hb, Hc, Hd as shown in the figure