|
|
|
Categories
|
|
Information
|
|
Featured Product
|
|
|
 |
|
|
There are currently no product reviews.
 ;
Full Panasonic service Manual, as described, no problems
;
This place is amazing. Got our manual in a few hours. Print quality is excellent. Even the manufacturer didn't have this manual. The price was excellent. How many more stars can I give them? More than satisfied.
;
This was a very hard to find manual. The unit is long discontinued and Pioneer doesn't retain every manual for every model. Thanks owner's-manual.com!
 ;
I'm so glad I was able to find a site to download my missing manuals. Very reasonable prices and they kept me informed about the process and I had my manual within less than a day. The only thing I wish was an option is a 100% English version with no spanish or anything. But overall great site.
;
The manual is complete with excellent quality! One suggestion, show number of pages and weather it is multi-lingual. The AD 600 Manuel is about 76 pages and over half is non English. This results in a larger print job than usually needed. Having this information, one could select the desired pages for printing.
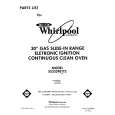
Surface Burners 0IO on ,� PO 0 B
TYPICAL TOP BURNER FLAME
To remove the cooktop, follow the instructions on pagel3. Wipe off surface burners with warm soapy water and a soft cloth after each use. Occasionally check surface burner flames for size and shape as shown. If flames do not burn properly, you may need to remove the surface burners for cleaning (see pagel7) or call a qualified technician for burner adjustments,
To adJust the HI and LO settings 2. Wlthout changing the burner on the control settings, knobs:
1. Turn on the surface burners, then set the controls on LO.
remove the control knobs. 3. Firmly grasp the control stem and insert a small bladed screwdriver into the end of the stem. Turn the screwdriver in either direction until the flame height isYe in (.318cm) or lower in size. Flame must be large enough to
malntaln a STABLE FLAME on all burner ports. NEVER ADJUST THE FLAME SIZE AT THE MEDIUM SETTING.
The Oven Door
sier to clean the oven.
Open the door to the first stop position. 2. Hold the door at both sides and lift off of hinges at bottom corners of door. 3. To replace, fit the bottom corners of the door over the ends of the hinges. Push the door down evenly. The door will close only when it is on the hinges correctly.
14
|
|
|
> |
|