|
|
|
Categories
|
|
Information
|
|
Featured Product
|
|
|
 |
|
|
There are currently no product reviews.
 ;
Manual correct, and complete. Downloads cleanly. Format of manual was presumably difficult to PDF to A4, but works reasonably well.
 ;
This was a hard to find manual. When I did find it , some sites wanted way too much for the file.
Owner-manual .com had it for a really reasonable price. Not only that but it was sent very quickly and was a quality scanned document, unlike some others I purchased from a different site.
Good job guys!!
Larry
;
Fast and courteous service. Product delivered as described. Thank you.
;
Last week I bought a second hand Panasonic AG-7500 SVHS Hi-Fi Video Cassette Recorder. It is a professional machine with many video and audio options. I feared it would be a huge quest to find a manual. I was delighted when I found owner-manuals.com. After payment I received the file to download the next day already. The quality is great. I am very happy. Thanks!
;
The owner's manual/operating instructions that I purchased was the original factory document and it was in at least three and maybe more languages. I no longer have it because I sold the tape recorder and included the owner's manual/operating instructions and a service/repair manual that I bought on ebay for the new owner.
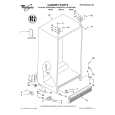
ENSURING PROPER AIR CIRCULATION
In order to ensure proper temperatures, you need to permit air flow between the two sections. As shown in the illustration, cool air enters through the bottom of the freezer section (1) and moves up. Most of the air then flows through the freezer section vents (2) and recirculates under the freezer floor (3). The rest of the air enters the fresh section through the top vent (4). Do not block any of these vents (1, 2, 3, or 4) with food packages. If the vents are blocked, air flow will be prevented and temperature and moisture problems may occur. IMPORTANT: Because air circulates between both sections, any odors formed in one section will transfer to the other. You must thoroughly clean both sections to eliminate odors. To prevent odor transfer and drying out of food, wrap or cover foods tightly. (See the �Food Storage Guide� section for details.) 1
2
3 1 4
REMOVING THE DROP-IN DOOR TRIM
To remove the trim piece: 1. Remove all items from the shelf. 2. Pull straight up on each end of the trim piece.
To replace the trim piece: 1. Locate each end of the trim piece above the trim pocket opening. 2. Push the trim ends straight down until they stop. 3. Replace items on the shelf.
10
|
|
|
> |
|