|
There are currently no product reviews.
 ;
Great quality complete service manual! complete parts list and drawings. Thanks!
;
Very good quality, prompt response. This website has reasonable prices and wide range of manuals that are hard to find.
;
The document was usefull, and it was exactly what I was looking for.
;
OK?..manual is complet and helpfull... for repairing such a old and rare boombox like JVC PCM it is necessary...
;
Super Anleitung. Ordentliche Auflösung. Das ganze noch in Deutsch wäre zu schön. Alle Datenblätter sind sauber Kopiert und alle Leitungswege sind sauber ausgeführt
D
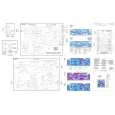
Demontage
GB
Disassembly
Demontageschritte Disassembly steps
Entfernen, entriegeln, abziehen Remove, unlock, disconnect
Bemerkungen Remarks
Fig. Fig.
Frontblende (F), Front Panel (F)
Release Panel Release Panel
abnehmen remove
Schrauben (2xE) Screws (2xE)
abschrauben unscrew
1
Feder (2xD) Spring (2xD)
entfernen remove
1
Rahmen (B) Frame (B)
Rahmen vorsichtig abziehen. Carefully remove the Frame.
1+2
Schrauben (4xG) Screws (4xG)
abschrauben unscrew
2
Frontblende (F) Front panel (F)
Frontblende vorsichtig abziehen. Carefully remove the front panel.
Laufwerk (C), Mechanism (C) (ADC 1400 + TN 705)
Schrauben (4xA) Screws (4xA)
abschrauben unscrew
3
X 1110 + X 1302 X 1110 + X 1302
vorsichtig abziehen carefully unplug
3
Laufwerk (C) Mechanism (C)
Laufwerk vorsichtig nach oben abheben. Carefully lift out the mechanism.
3
Laufwerk (K), Mechanism (K) (TN 708)
Schrauben (4xA) Screws (4xA)
abschrauben unscrew
4
Laufwerk (K) Mechanism (K)
Laufwerk vorsichtig nach oben abheben. Carefully lift out the mechanism.
4
X 1301 X 1301
vorsichtig abziehen carefully unplug
5
-6-
|