|
|
|
Categories
|
|
Information
|
|
Featured Product
|
|
|
 |
|
|
There are currently no product reviews.
 ;
Quality as promised it arrived fast. No problems what so ever
;
Good scan, very handy and it also includes the user manual. 122 pages in total.
;
This manual was exactly what I needed. Detailed, useful and delivered as promised.
 ;
Great manual good quality really helped in the repair of my Toshiba, thanks
;
Print was clear and easy to read. Thank you Joe joeoldaudio
2. Alignment and Adjustment
2-1 Reference
1) X-Point (Tracking center) adjustment, �Head switching adjustment� and �NVRAM option setting� can be adjusted with remote control. 2) When replacing the Micom (IC601) and NVRAM (IC605 ; EEPROM) be sure to adjust the �Head switching adjustment� and �NVRAM option setting�. 3) When replacing the cylinder ass�y, be sure to adjust the �X-Point� and �Head switching adjustment�. 4) Among Samsung VCR remote control used for adjustment as a accessory, only the remote control that has figures buttons (0 ~ 9) is available for all adjustment regardless of chassis. 5) How to adjustment. - Press the �SW718 (TEST)� button on Main PCB to set the adjustment mode. - If the corresponding adjustment button is pressed, the adjustment is performed automatically. - If the adjustment is completed, be sure to turn the power off.
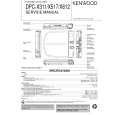
2-1-1 Location of adjustment button of remote control
VCR STANDBY/ON
TV STANDBY/ON
SLOW
TV
SHUTTLE
VCR
X-Point (Tracking Center) Adjustment ("5" Button)
CLR/RST -/-INPUT REPEAT
V-LOCK
DISP./
F.ADV
INDEX
VOL
PROG/TRK
MENU
A UDIO
DUB
NVRAM Option Setting ("MENU" Button) Head Switching Adjustment ("SPEED" Button)
REC
ED SPE
OK SAT
<This type of remote control can adjust.> Remote Control for adjustment is not supplied as a Service Jig. Fig. 2-1 Samsung Electronics 2-1
|
|
|
> |
|