|
|
|
Categories
|
|
Information
|
|
Featured Product
|
|
|
 |
|
|
There are currently no product reviews.
 ;
Excellant, finally this is want I need and searching for The service manual is fantastic and thank you to owner-manuals.com and its service. Price is reasonable. It's a bit slow on my end in downloading but manage to receive the whole manual without a break. once again, thanks.
;
Very good scanning quality. All schematics are very legible. Worth every cent !
;
Excellent quality, very quick download turnaround, will definately use again.
 ;
This is a awesome quality scan of the original Service Manual for Technics 8099.
Contains the circuit diagram, PCB layout, adjust/tune instructions as well.
Since this is my first buy here, i'm really glad! This site do works as intended/described, it's definitely not scam!
Мои рекомендации! Все мануалы настоящие!
;
Good Quality of the File.
You get the normal manual is incudet.
2-1
DISASSEMBLY INSTRUCTIONS
Dismantling the Speaker Grille & Speaker Driver 1. Place the Subwoofer Box as shown in the Picture 1 and use a screw driver to force open the Speaker Grille. Caution: Take care the surface when take out the Speaker Grille of Subwoofer
2. Place the Subwoofer Box as shown in the Picture 2 and loosen 4 screws A to remove the Speaker Driver.
A
Picture 1
Picture 2
Dismantling the Front Assembly
1. Place the Subwoofer Box as shown in the Picture 3 and use a screw driver to force open the front assembly.
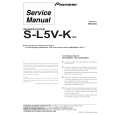
Dismantling the Rear assembly
1. Loosen 10 screws B as shown in the Picture 4 (Rear View) to pull out the Printed Circuit Board assembly.
Caution: Do not break the bundle of wires to the front. Take care the surface when take out the front panel of subwoofer
Caution: Do not break the bundle of wires to the front.
B
Picture 3
WARNING: THERE IS ONLY A LED BETWEEN THE FRONT PANEL AND WOOD BOX. IF NOT NECCESSARY, PLEASE DON�T TRY TO OPEN THE FRONT PANEL!!!
Picture 4
|
|
|
> |
|