|
|
|
Categories
|
|
Information
|
|
Featured Product
|
|
|
 |
|
|
There are currently no product reviews.
 ;
Very good detail, all pages clear, exactly what I needed
;
Excellent service, and just what I needed to service my TU-7700. All pages of the manual are clear and easily readable.
;
Excellent printing quality.
A complete and very usefull service manual with all details.
GREAT SERVICE AT VERY LOW PRICE!
A+++++++++++++++++++++++++
;
We received the manual in a timely manner and it was exactly what we were expecting. Excellent replacement for original Service Manual.
All schematics are very legible. We are really satisfied.
;
We received the manual in a timely manner and it was exactly what we were expecting. Excellent replacement for original Service Manual.
All schematics are very legible. We are really satisfied.
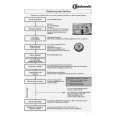
Abgleich / Alignment
CUC 2103/M, 2121/M
Alignment 9. Line Sharpness
Preparations Colour video generator: Feed in a convergency test pattern. Contrast: maximum Set the screen brightness so that the black background of the test pattern just starts to brighten.
Alignment Process With focus control UF, adjust the vertical lines approx. 5cm from the right and left picture edge to minimum horizontal width. The sharpness in the middle must not seem to be worse than the sharpness at the edges. If necessary, take an average. Adjust according to the test pattern using button or .
10. Vertical position of the picture (Vertical Shift) 10.1 Vertical Amplitude 10.2 Vertical Linearity
Colour video generator: Feed in a geometry test pattern. Call up the "Vertical Shift" menu via " " (DIALOG CENTER) �> "OK" �> SERVICE �> "OK" �> Service Code "8500" �> "GEOMETRY" �> "OK". Call up the menu "Vertical Amplitude". Call up the menu "Vertical Linearit.".
Set the vertical amplitude using button
or
. or .
Adjust according to the test pattern using button
10.3 Horizontal position of the picture (Horizontal Shift)
Call up the menu "Horizontal Shift".
Adjust according to the test pattern using button
or
.
Go back to the "SERVICE" menu with " " and terminate the dialog line "End" "with mem" �> "OK".
2-4
GRUNDIG Service
|
|
|
> |
|