|
|
|
Categories
|
|
Information
|
|
Featured Product
|
|
|
 |
|
|
There are currently no product reviews.
 ;
This is exactly the service manual I needed.
Complete with all schematics, partslists, PCB layouts and alignment instructions.
This manual covers both the T-4970 en T-488F Onkyo tuner.
 ;
IF PRINTED CIRQUIT BOARD WIRING VIEW WAS ONE TONE LIGHTER, THEN 5 STAR RANK HAS TO BE MY CHOISE.
;
Very usefull, good quality drawings !
Muito útil encontrei todas as informações necessárias.
;
Wanting to repair a neighbours tape recorder I needed the necessary information, it makes it easier. Although the service manual is described as "Language : English" To my dismay I found that it is entirely written in German, a language I do not understand. At least I now have the schematics which will help of sorts. I may not use this service again due to the laguage difficulty after all when it states English you do not expect it to be entirely in another language.
;
GOOD SERVICE MANUAL.I ALWAYS BUY THERE IF I FIND WHAT I AM LOKING
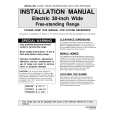
SECTION 2 DISASSEMBLY
Note : Follow the disassembly procedure in the numerical order given. CASE Unscrew the five case attachment screws M3 � 8 and remove the case.
2-1. FRONT PANEL ASSY
POWER VOLTAGE SELECTOR 1 - 2 (Singapore, Malaysia) FRONT PANEL ASSY 1 - !¶
2 power voltage selector
1 BVTP 3x8
!§ CN501, 502 !¢ claw 8 CN51 0 CN002
3 CNA807 4 CNS802 5 CNA801 (US, Canadian) 6 CNA803 1 BVTP 3x8 2 lug plate
!¡ CNP73 (WE725/WE825S) 7 CNA806 !� claw !¶ CN503, 504 !� BVTP 3x6 !� front panel assy 9 CN51
!£ BVTP 3x8
2-2. MECHANISM DECK
1 Press the EJECT button. 2 claws
3 cassette lid 6 mechanism deck
5 BVTP 2.6x8
4 BVTP 2.6x8
�5�
|
|
|
> |
|