|
|
|
Categories
|
|
Information
|
|
Featured Product
|
|
|
 |
|
|
There are currently no product reviews.
 ;
everything is ok, thank you very much! Product is good, no problems with download!
;
Great site, I always find all the manuals I need and i can't find anywhere else. PDF for the Sony PCM 3348 is complete and scan is good quality. Thank you!
;
It was a complete manual as stated. Very good source for older product manuals. Thanks
;
Scan quality is very good. Price is very reasonable. If you're looking to purchase a copy of this manual, this is the one to get.
 ;
Perfect for my use.Could have better pictures,but otherwise perfect ;)
Vielen Dank für den Kauf dieses einzigartigen Kompakttelefons ELEGANCE 33 von Philips. Wir sind sicher, Sie werden mit diesem Gerät schätzen lernen, wie hoch die Qualitätsansprüche bei Philips gesetzt sind. Im Lieferumfang sind folgende Teile enthalten: � eine Ablageschale � ein Hörer � ein Spiralkabel � ein Benutzerhandbuch � zwei Schrauben zur Wandmontage
GEBRAUCHSANWEISUNG
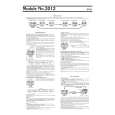
Anordnung der Tasten, Kontroll- und Bedienungselemente
Kompakttelefon mit Kabelanschlu� Stummschaltungs-Leuchtanzeige bei Anruf Digitale Lautstärkeregelung Einstellen des Anrufzeichens 3 Zielwahltasten 10 Nummernspeicher Kabelunterbringung
10 4
P
1 3
6
R 1
ABC
5
2 5
DEF
3 6
7
4
GHI
8
JKL
MNO
PQRS
7
TUV
8 0
WXYZ
9 #
M1
M2
M3
9
2
0
Abb. 1
1. 2. 3. 4. 5.
Schalter für Klingellautstärke Laut/Leise/Aus Schalter für Ton-/Pulswahl Optische Anrufanzeige (LED) Schalter für Hörerlautstärke Wahlwiederholung/Pause
6. Speichertaste 7. Flash- /Rückruftaste 8. Nummernspeicher (Umschalter) 9. Direkte Zielwahltasten Ml, M2, M3 10. Kabelunterbringung
Installation
Einstellung der Wahlart
Sie können Ihr Telefon mit Hilfe des Schalters rechts unten am Hörer auf Mehrfrequenzwahl ( ) oder Pulswahl ( ) einstellen. (Siehe Abb.1, 2 )
P
R 1
GHI ABC
2 5
DEF
3 6
Einstellung der Klingellautstärke
Mit Hilfe des Schalters an der oberen rechten Seite des Hörers können Sie die Klingellautstärke auf laut/leise oder aus ( ,, ) stellen. Hinweis:Die Anruf-Anzeige (LED) wird bei jedem eingehenden Anruf aufleuchten, auch wenn der Schalter für die Klingellautstärke auf �Aus�gestellt ist.
4
JKL
MNO
PQRS
7
TUV
8 0
WXYZ
9 #
M1
M2
M3
0
Abb. 2
Schlie�en Sie das Verbindungskabel an die Telefonbuchse an.
Einstellung der Klingelzeichenfrequenz
P
R 1
GHI ABC
2 5 8 0
DEF
3 6 9 #
Sie können drei Geschwindigkeiten (langsam/normal/schnell) für den Klingelton einstellen.
langsam
4
JKL
MNO
PQRS
7
TUV
WXYZ
M1
M2
M3
0
Speichern oder normal oder
Speichern
Abb. 3
Abb. 4
Nicht benötigtes Kabel kann unter der Ablageschale aufgewickelt werden.
schnell
Wandmontage
1. Drehen Sie den Wandmontageknopf mit einem Schraubenzieher um 180º. (Abb. 5) 2. Die Halterung ist jetzt für die Wandmontage vorbereitet. (Abb. 6) 3. Hängen Sie die Halterung an den Schrauben ein. (Abb. 7)
Hinweis:Wenn das Telefon ausgesteckt wird, stellt sich das Klingelzeichen automatisch auf die Standardeinstellung �normal� zurück.
Einstellung der Hörerlautstärke
Sie können die Hörerlautstärke regulieren, indem Sie den dafür vorgesehenen Schalter an der oberen linken Seite des Hörers entsprechend einstellen. (Siehe Abb. 1, 4 ) 1. Um die Lautstärke zu verringern, drücken Sie die Taste in Richtung des (-) Zeichens. 2. Um die Lautstärke zu erhöhen, drücken Sie die Taste in Richtung (+). Nach dem Einhängen des Hörers, wird die ursprüngliche Lautstärke wieder eingestellt.
Abb. 5
Abb. 6
Abb. 7
|
|
|
> |
|