|
|
|
Categories
|
|
Information
|
|
Featured Product
|
|
|
 |
|
|
There are currently no product reviews.
 ;
Thank´s for your help, I already recived these manual from you
;
Thank you for your manual It has the basic things to and i use the Oszi for Longer Time.
THX
;
Actually, I was looking for this information for 3 years!...now thanks to you, the manual is on my hands and of great help, cause I understand now where I was doing wrong connections and wires...excellent, I'll be back to you if in need, thank you.
 ;
This manual covers the main equipment features only. While it also includes the procedure for saving and loading from the now long obsolete memory cards it does not mention the how to operate with the optional floppy drive interface so I am still at a loss about how to use this! Note that there is a separate manual covering the MIDI interface and programming via the keyboard, not included in this download. You will also need to get hold of this if you want to use the MIDI interface properly. Basically there is little difference between this manual and the free to download manual for the similar PR60 model.
;
Good list of manuals. I found a very rare one and easily get. Should be promptly to download, as we must to wait hours even after confirmed payment.
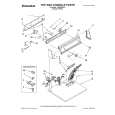
Using
(on some
the drying
models)
rack
4. Select the Timed drying cycle (and temperature, if needed) or the No Heat Fluff cycle (see page 7). 5. Push the Start Button. a
The drying rack lets you dry items that you may not want to tumble. The rack does not move, but the drum turns. 1. Fit rear legs of the rack into indentations -in the back wall of the dryer. Lower the front so the legs rest on the dryer opening.
2. Put wet items on top of the rack. Leave space between the items so air can reach all surfaces. NOTE: Make sure nothing hangs over the edge of the rack. 3. Close the door.
NOTES: See the chart below for suggested cycles l and settings for the different types of items that might best be rack dried. The rack must be removed for normal l tumbling. l Drying time will depend on how much moisture the items hold. The following chart suggests drying times. l Automatic cycles do not work with the drying rack.
RACK DRY Wool sweaters (Block to shape and lay flat on the rack) Stuffed toys or pillows (Cotton or polyester fiber filled) Stuffed toys or pillows (Foam rubber filled) Sneakers or canvas shoes
l
CYCLE Timed Timed No Heat Fluff LOW I None; cycle is unheated. 90 30-40 60
Reset cycle as needed to complete drying.
11
|
|
|
> |
|