|
|
|
Categories
|
|
Information
|
|
Featured Product
|
|
|
 |
|
|
There are currently no product reviews.
 ;
Delivery came quite promptly and in a very readable format. Thank you.
;
I found my Clarion VRX8370R in the Camper I bought and I wasn't able for month to understand it.
The Owner Manual was perfect and just what I was searching for.
Thank you.
Leonardo
;
Very good copy of Manual, clear and easy to print off, arrived very promptly and reasonably priced.
Thanks, I will use you again.
;
Zeer duidelijke afdrukken op A4-formaat , zeer uitgebreide handleiding . Pluspunt ,zeer snelle
respons van jullie , binnen de 24h . Top !!!
;
I AM HIGHLY IMPRESSED BY THE EASE OF USE OF THIS DOWNLOAD SERVICE. INSTRUCTIONS ARE CLEAR AND SIMPLE TO FOLLOW....EVEN BY TECHNOPHOBES SUCH AS MYSELF. THE EMAILS POINT YOU IN THE RIGHT DIRECTION...ITS SO EASY PEASY. THE DOWNLOAD CHOICE OF USER MANUALS IS EXTENSIVE AND I COULD NOT FIND A CHEAPER OR MORE EFFICIENT SERVICE ON THE INTERNET. I COULD NOT HAVE MADE A BETTER CHOICE OF INFORMATION PROVIDER. SHOULD I EVER NEED ANOTHER USER MANUAL, THEN THIS IS THE FIRST CHOICE SITE. COULD NOT BE BETTER PLEASED!!!!!!!...MANY THANXES FROM JIM BURNS
Control Lock
The Control Lock shuts down the control panel pads to prevent unintended use of the oven. When the control is locked, only the Clock and Timer pads will function. To Lock/Unlock Control: Before locking, make sure the oven and Timer are off. Touch and hold START/ENTER for 5 seconds. A single tone will sound, and �LOC� and �LOCK�D� (on some models) will appear on the display. �LOC� will also appear whenever any command pad is pressed while the control is locked. Repeat to unlock. �LOC� and �LOCK�D� (on some models) will disappear from the display.
OVEN USE
Odors and smoke are normal when the oven is used the first few times, or when it is heavily soiled. IMPORTANT: The health of some birds is extremely sensitive to the fumes given off. Exposure to the fumes may result in death to certain birds. Always move birds to another closed and well-ventilated room.
Positioning Racks and Bakeware
IMPORTANT: Do not place food or bakeware directly on the oven door or bottom. Permanent damage will occur to the porcelain finish.
Oven Temperature Control
IMPORTANT: Do not use a thermometer to measure oven temperature because opening the oven door and element or burner cycling may give incorrect readings. The oven provides accurate temperatures; however, it may cook faster or slower than your previous oven, so the temperature calibration can be adjusted. A minus sign means the oven will be cooler by the displayed amount. The absence of a sign means the oven will be warmer by the displayed amount. Use the following chart as a guide. ADJUSTMENT °F 10°F (5°C) 20°F (10°C) 30°F (15°C) -10°F (-5°C) -20°F (-10°C) -30°F (-15°C) COOKS FOOD ...a little more ...moderately more ...much more ...a little less ...moderately less ...much less
5 4 3 2 1 6
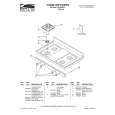
RACKS
NOTES: s Position racks before turning the oven on.
s s
Do not move racks with bakeware on them. Make sure racks are level.
To move a rack, pull it out to the stop position, raise the front edge, then lift out. Use the following illustration and chart as a guide. FOOD Frozen pies, large roasts, turkeys, angel food cakes Bundt cakes, most quick breads, yeast breads, casseroles, meats Cookies, biscuits, muffins, cakes, nonfrozen pies Extra-large items RACK POSITION 1 or 2 2
To Adjust Oven Temperature Calibration:
1. Press and hold BAKE for 5 seconds until the oven display shows the current calibration, for example �00.� 2. Press the TEMP/TIME �up� or �down� arrow pad to increase or to decrease the temperature in 10°F amounts. The adjustment can be set between 30°F and -30°F. NOTE: All temperature adjustments will be displayed in Fahrenheit. 3. Press START/ENTER.
2 or 3
6
9
|
|
|
> |
|