|
There are currently no product reviews.
 ;
Excellent had everything I wanted, very happy with purchase
 ;
This service is relatively cheap, document is fast available, schematic is readable.
Thanks.
;
So far I´m a satisfied customer. I have only downloaded "TECHNICS SX-KN470 Service Manual" maybe I will use it later.
Best regards
Peter
;
Good manual. It is complete and of high quality, both text and graphics. The schematics are with the original big size, so it can be viewed or printed without any loss of resulution and sharpness.
;
We needed a manual quickly...online it was available immediately, at a very low price. We loved the convenience!
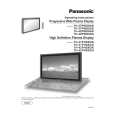
TH-37PWD8BK
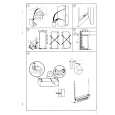
7.18. Removal of stand brackets
1. Remove the plasma panel section from the servicing stand and lay on a table (covered), with the plasma panel surface facing downward. Spread a soft cloth for protection, to prevent panel surface from scratching. 2. Remove the stand bracket (left, right) fastening screws (�4 each) and remove the stand brackets (left, right).
7.19. Replacement of the plasma panel
1. Place the new plasma panel (finished) on the flat surface of the table (covered by a soft cloth), with the plasma panel surface facing downward. 2. Fit the stand brackets (left, right.) fasten 4 screws each on the new plasma panel. 3. Place the plasma panel section on the servicing stand. 4. Attach the front frame, each P.C.Board and so on, to the new plasma panel. * When fitting the front frame, be careful not to allow any debris, dust or handling residues to remain between the front glass and plasma panel.
16
|