|
There are currently no product reviews.
 ;
y'm hapy for this shoping . Estoy feliz por esta compra , ahora puedo reparar mi equipo de audio que AMO . And very good price for this manual . Thank yuo .
;
Perfect manual, perfect service. Easy reading. Thanks a lot
;
Very good quality download here. Great hard to find manuals at a reasonable price.
 ;
I had a problem with the mains transformer, I did not know the voltages on the secondary, this manual helped me to solve this problem, thanks for the manual!
;
Great manual, great quality copy, complete parts reference and scematics, Thank you
TH-50PX60U
6.5.
4. Remove the screws (�5 6. Remove the P-Board. ). ). 5. Remove the molding props (�8
Remove the PA-Board
1. Unlock the cable clampers to free the cable. 2. Disconnect the couplers (PA2, PA5, PA10, PA31, PA32, PA33, PA34 and PA40). 3. Disconnect the flexible cable (PA20). 4. Remove the screws (�4 5. Remove the PA-Board. ) and remove the earth cable.
Note: When assembling the P-Board, the position of each hole of the insulation sheets (A and B) is set to the position of each hole of the P-Board, then assemble them. ( marks indicate setting positions.)
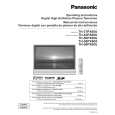
6.6.
Remove the tuner unit
1. Unlock the cable clampers to free the cable. 2. Disconnect the couplers (DG5, G51, GS52, PA40 and earth cable). 3. Disconnect the flexible cables (DG3 and PA20). 4. Remove the screws (�4 ) remove the tuner unit.
9
|