|
|
|
Categories
|
|
Information
|
|
Featured Product
|
|
|
 |
|
|
There are currently no product reviews.
 ;
manual was very helpful in learning how to propery use my washer. I could not find this manual anywhere else.
 ;
Awesome quality manual. You really saved my bacon with this one. Was looking for some specific information with regards to my "new" vintage VCR that didn't come with the owners manual. This site is truely a goldmine of available manuals. The quality of the scans are top notch.
Thank-you so much for this awesome manual. If you're looking for this Sony SL-HF400 owners manual, this is the one you NEED to buy. Definitely worth the money.
;
The manual was made available promptly. I is a clean scan of the original. I had no problem downloading it. The scan was well centered and cleanly formatted. It is as good a product as can be had without being the original document.
;
Received downlink in less then 8 hours, Item was in good copy condition, and told me how to program the clock timer. The price was very resonable, and the process was very automated and was GREAT to work with.
;
Fast service, document is OK. Thanks! Searched for it long time.
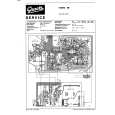
CONNECTION/INSTALLATION
Mounting the camera
Camera mounting screw Camera-mounting bracket
ISOLATED POWER ONLY (E TYPE)
When mounting the camera on a fixer, pan/ tilt, etc., use the camera mounting screw hole located on the camera-mounting bracket. CAUTION: Use the screw with a length shorter than 7mm from a camera-mounting face.
q
IRIS VIDEO DC
Installation of camera � Mounting from the bottom This camera is originally designed to be mounted from the bottom, as shown q. The hole is standard photographic panhead screw size (1/4-20 UNC). Example the Fixing unit or Pan/Tilt unit. � Mounting from the top Remove the CAMERA MOUNTING BRACKET from the bottom of the camera by removing two fixing screws as shown w. Attach the CAMERA MOUNTING BRACKET to the top, then mount the camera on the Fixing Unit as shown e. Make sure that two original screws are used when mounting the CAMERA MOUNTING BRACKET. Be sure to use a 6 mm long locking screw for the cameramounting bracket. (This camera is used indoor and under similar conditions.)
MAX.
7mm
Rotation prevention hole
Furthermore, make use of the rotation prevention hole to prevent the camera from falling and securely mount the camera. Special precautions must be taken for mounting the camera on a wall or a ceiling. We are not liable for any damage caused by improper installation. Fall Prevention � Exercise maximum caution when installing the unit to the wall or ceiling. You should not engage in the installation work yourself. Ask a professional to do the job, since the fall of the unit can result in injuries and accidents. � When installing the unit on a fixer, Pan/ Tilt unit, etc., make sure to install it firmly using a rotation-preventing hole provided to prevent fall. � To prevent fall, connect the unit to a section with sufficient strength (ceiling slab or channel) using a fall prevention wire such as a wire chain and the like. Use the black screw on the back of the unit for installation. Pay utmost attention to the length of the wire, too. � Specified screw (M3 � 6 mm) Never use any screw longer than the specified length as the inside can be damaged.
w
Cameramounting bracket
+
1
2
AC24V
DC12V
CLASS 2 ONLY(U TYPE)
TX+ TXA B
GND RX+ RX- AUX
C D
Y/C
OUT
6mm
VIDEO OUT SYNC IN PO WER
INS SE CT TRUE ION MANUAL
M3 x 6mm
2mm
Fixing screws
e
This diagram shows the installed example of the TK-C1480BE. Be sure to install a fall preventive wire likewise in case of the TK-C1481BEG.
VIDEO DC
IRIS
E-18
E-19
|
|
|
> |
|