|
|
|
Categories
|
|
Information
|
|
Featured Product
|
|
|
 |
|
|
There are currently no product reviews.
 ;
everything is ok, thank you very much! Product is good, no problems with download!
;
Great site, I always find all the manuals I need and i can't find anywhere else. PDF for the Sony PCM 3348 is complete and scan is good quality. Thank you!
;
It was a complete manual as stated. Very good source for older product manuals. Thanks
;
Scan quality is very good. Price is very reasonable. If you're looking to purchase a copy of this manual, this is the one to get.
 ;
Perfect for my use.Could have better pictures,but otherwise perfect ;)
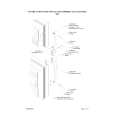
Important Handle Reversing Instructions
This information replaces handle reversing instructions step 1, letter �h� of the Installation Instructions. 1. Remove handle screws with phillips screwdriver. Remove handle from refrigerator and freezer door. Remove button plugs from hinge side of door using screwdriver with the blade covered in masking tape. 2. Install handle on opposite side of doors using removed screws. Install button plugs in holes left from handle screws.
Button plugs
Handle screws
Importantes directives concernant l�inversion de la poignée
Ce qui suit remplace les directives concernant l'inversion de la poignée (étape 1, paragraphe «h») des Instructions d'installation. 1. Retirer les vis de la poignée à l'aide d'un tournevis cruciforme. Retirer la poignée de porte du réfrigérateur et celle du congélateur. Enlever les bouchons des boutons du côté charnière de la porte avec un tournevis dont la lame est recouverte de rubancache adhésif. 2. Installer la poignée sur le côté opposé des portes à l'aide des vis déjà retirées. Installer les bouchons des boutons dans les trous laissés des vis de la poignée.
Bouchons des boutons
Vis de la poignée
Instrucciones importantes sobre cómo invertir el tirador
Esta información reemplaza el paso 1 letra "h" de las instrucciones de inversión del tirador de las instrucciones de instalación. 1. Extraiga los tornillos del tirador con un destornillador phillips. Quite el tirador de la puerta del refrigerador y del congelador. Con el destornillador cuya punta ha sido cuierta con cinta adhesiva, extraiga los tapones de botón de la puerta del lado donde está la bisagra. 2. Monte el tirador en el lado opuesto de las puertas usando los tornillos de montaje que quitó en el paso anterior. Introduzca los tapones de botón en los agujeros que quedaron de los tornillos del tirador.
Tapones de botón
Tornillos del tirador
Part No. 12346701
Printed in U.S.A.
|
|
|
> |
|