|
There are currently no product reviews.
 ;
excellent quality, contains circuits and scan quality, 110 pages
;
It was easy done, and I got exactly what I was looking for.
;
The manuel was exactly what I needed and I received it promptly. Thanks
;
Thanks to Owner-Manuals.com! This manual was exactly what I needed. As Amana was purchased by Maytag and later by Whirlpool, there was no way to receive it from their websites. I was lucky to find this resource.
 ;
Great to be able to set channels again, on an old but stoll fine working TV
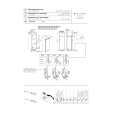
Connections and installation
(Continued) Notes � When the projector is moved from a cold location to a warm location, or when the ambient temperature in the projection room has risen suddenly, moisture may condense on the lens or the mirror to blur the projected pictures. In such a case, leave the projector for an adequate time (1 to 2 hours, depending on the room�s condition) before using it so it adjusts to the ambient temperature. � If the screen is exposed to direct sunlight or other strong light, the projected picture becomes too faint to see. Shut out the light with curtains or other means. � If the screen and the projector are not installed properly, the projected picture may be distorted. � If the projector is tilted, the picture may be distorted. To obtain the best possible picture, place the projector so it faces the screen squarely.
CONTENTS How to use the foot adjuster
The tilt of the projector can be adjusted using the foot adjuster.
20
3) To put the foot adjuster back, hold down the foot adjuster release button and lower the front slowly.
The foot adjuster will put back. Note Be sure to hold the projector when putting the foot adjuster back so as not to let the front fall on your fingers.
1) Lift the front of the projector until a tilt angle desired is obtained and hold down the foot adjuster release button.
The foot adjuster will stretch. Release the button to lock in position.
Foot adjuster release button
Foot adjuster
2) Turn the foot adjuster to make fine adjustment of the height.
Turn clockwise to lift up. Turn counterclockwise to lower.
Lift up
Lower
|