|
|
|
Categories
|
|
Information
|
|
Featured Product
|
|
|
 |
|
|
There are currently no product reviews.
 ;
Excellent copy that was delivered within 12 hours and solved my problem.
 ;
I did not have the manual for a Whirl Pool gas dryer, therefore I purchased it from Owner-manuals. This is exactly what I needed. Thank you for the service.
;
I was so pleased to get the owner`s manuel within one hour! Thanks again.
Regards
Werner
;
Finding the owners manual for my Pioneer CRWM62R is greatly appreciated. I had searched several other web sites with no success. Although my manual was not listed on your site for immediate download, I recevied an email within a few hours that my ower's manual was posted for me. I had no difficulty downloading the manual for my 20 year old multi-cassette player. Owner Manuals provides a service that is valuable, easy-to-use, accurate , efficient, and priced fairly. I thank you.
;
Excellent manual - just what I needed. Although currently available only in German, their are lots of pictures which makes it all very clear.
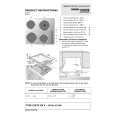
PRO TT-2 Turntable TONE ARM ASSEMBLY 19. Headshell Locking Nut - Attach headshell by inserting into the front end of the tonearm, then turn the locking nut clockwise with the head shell firmly held horizontally.
26
22 23
25 24 21
20. S-Shaped Tone Arm 21. Tone Arm Clamp and Rest - Use this rest for the tone arm and clamp it in position during transportation. 22. Tone Arm Lift - This elevates the tone arm above the record surface. 23. Tone Arm Lift Adjust Screw - Controls the amount of lift. 24. Tone Arm Lever - Controls the up and down action of the Tone Arm Lift. 25. Anti-Skate Control - This applies inward force to the tonearm so it doesn�t skip outward across the record due to the centrifugal force of the record spinning. Cartridge manufacturers usually specify the proper setting of this. 26. Counterweight - Adjustment creates the proper downward pressure of the stylus to the record. Attach now by sliding the counterweight onto the rear of the tonearm. Twist it lightly and it will screw onto the rear shaft of the tonearm.
20
19
18
18. Headshell- Install cartridge here. When installing a cartridge, refer to the installation instructions supplied by the manufacturer of that cartridge. During installation, attach the stylus protector to guard the stylus tip from damage. Attach wires as follows: White (L+) Left channel + Blue (L-) Left channel Red (R+) Right channel + Green (R-) Right channel
- The Leader in DJ Technology
©2000 Industries -7http://www.numark.com
|
|
|
> |
|