|
|
|
Categories
|
|
Information
|
|
Featured Product
|
|
|
 |
|
|
There are currently no product reviews.
 ;
Product was very good. Received quickly and complete
 ;
Although printing quality is not the best, the manual was very helpful in order to reactivate this ancient but still good electronic musical instrument.
;
as a first-time user and buyer from this site, i found the overall service outstanding!! this product is a godsend as, without it, i would never have been able to find my way around and use my machine as intended. i will certainly use this site again as required. many many thanx!!
;
This manual is exactly what I needed. This site always has every manual I need, and it is also much less expensive then most other sites. This is the only manual site I will use.
;
Useful manual, good scan, worth the pay if you find the unit difficult to operate.
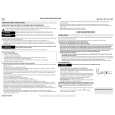
Using Your Freezer
F. Install and level freezer
Level freezer so the door will stay open at any position.
Leveling leg I( I Model and serial numf ler label(on side WL 3/I) Temperatu re controtLower Refrigerate stationary shelves 7 ,/
Stationary door shelves
-
7
1. Locate, remove and discard the 4 bolts that held the freezer in the shipping crate. 2. Locate the 2 front leveling legs among the packing materials. 3. Screw these legs into the front holes on the bottom of the freezer. The back of the freezer rests on 2 fixed supports. 4. Adjust the 2 front legs so freezer does not rock. 5. Connect freezer to proper electrical supply and attach retaining clip. (Refer to �D. Locate proper electrical supply� on paw 2.1 6. Slide freezer into place. 7. Place a level on top of the freezer - first side to side then front to back. Turn leg clockwise to raise a corner. Turn leg counter-clockwise to lower a corner. 8. Repeat step 7 until the freezer is level. 9. After freezer is fully loaded, recheck with level.
(Key eject lock
\
Lower storage gate.
Base grit/e
Leveling
Setting control
the temperature
0
Turn the control to 4. This setting is designed to maintain the temperature at or near 0°F (-17.8%) under normal operating conditions. Allow the freezer to cool 6 to 8 hours before filling with frozen food. Let the freezer cool overnight before adding large amounts of unfrozen food. Never add more than 2-3 pounds of unfrozen food per cubic foot of freezer space
NOTE: When the freezer is first staried. the compressor will run constantly until the cabinet is cooled. It may take up to 6 to 8 hours or longer, depending on room temperature and the number of times the freezer door is opened. After the cabinet is cooled, the compressor will turn on and off as needed to keep the freezer at the proper temperature. The outside of your freezer may feel warm. This is normal. The freezer�s design and main function is to remove heat from packages and air space inside the freezer. This heat is transferred to the room air, so the outside of the freezer may feel warm.
Adjusting control
l
the temperature
Turn control to a higher number for colder temperatures.
* Turn control to a lower number for less cold temperatures.
Page 3
|
|
|
> |
|