|
|
|
Categories
|
|
Information
|
|
Featured Product
|
|
|
 |
|
|
There are currently no product reviews.
 ;
Impeccable, document très complet. Perfect, i get all i need. All schematic are correct. Thanks
;
The manual is of better quality compared to other. I found it less expensive and therefore it it is the best buy cost vs quality.
 ;
I bought the service-manual of the sony ICB-1020(an old transmitter-receiver) at "www.Owners-Manual.com", I found the service-manual for a fairly cheap price(in comparison with other sellers). I filled in some questions, payed the order with Ideal, and within 24 hours I had my service manual. I was very happy:In no time I had my service-manual and everything, but literally everything was noted down in the manual; the electronic scheme, the parts list, etcetera.
A very practical, reference-document.
;
This comprehesive service maual was greatly appreciated, as was the digital download.
;
Good en helpfull black and white scanned Srfvice manual of the Philps D8444. Quick service and delivery
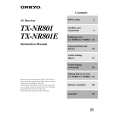
TX-NR801/E FRONT PANEL VIEW
To select an input source, press the desired button (REC OUT or ZONE 2) and then press one of the input source b utton within 8 seconds. That source will be output for recording or vie wing in the remote zone. To set the output to the source channel, press the desired b tton (REC OUT or ZONE 2) twice in sucu cession. turn of f the output, press the desired butTo ton (REC OUT or ZONE 2) and then press the OFF button within 8 seconds. Note: The Rec Out and Zone 2 buttons use the same -cir cuit and therefore cannot be used at the same time. When REC OUT is selected, nothing is output to Zone 2.When ZONE 2 is selected, REC OUT is automatically fix ed to SOURCE. SETUP button Press to enter the Setup Menu. The OSD Menu will appear on the TV monitor as well as the front display on the TX-NR801/TX-NR801E. ENTER button Press to display the screen for the item that is selected in the Setup Menu. RETURN button In the Setup Menu, press to go back one level. If pressed while at the Main Menu, you will exit the Setup Menu. MASTER VOLUME dial Use to control the volume in the main zone. The volume for the remote zone (Zone 2) is independent. VIDEO 5 INPUT terminals For connecting a video camera or g ame de vice. Input source buttons and indicators (DVD, VIDEO 1~5, TAPE, TUNER, PHONO, CD, and NET AUDIO) Press these b uttons to select the input source for the main zone. To select the input source for the remote zone (Zone 2) or recording out (REC OUT), first press the ZONE 2 or REC OUT button, and then press the desired input source button. The input channel with its indicator lit red is output to REC OUT and the one with its indicator lit green is output to ZONE 2. UPSAMPLING indicator Lights during upsampling. This function is available when the input source is Analog/PCM and the listening mode is set to the stereo or surround mode. PHONES jack This is a standard stereo jack for connecting stereo headphones. PURE AUDIO indicator Lights during pure audio playback.
Front Panel Display
A Input signal path indicators
Sho from which terminal the input signal is comws ing. B Listening mode or digital input format indicators One of these indicators lights to sho w the format of the current input source. In addition, one of the listening mode indicators lights to indicate the current listening mode. C Tuning indicators AUTO indicator Lights when recei ving FM broadcasts in the stereo mode.Turns of when placed into the monaural f mode. RDS indicator (Eur opean models only) Lights when an RDS station is being received. TUNED indicator Lights when a radio station is being received.
FM STEREO indicator Lights when an FM broadcast station is being recei ved in stereo. Turns of f when placed into the monaural mode.
D Multi function display
During normal operation, sho ws the current input source and volume. When the FM or AM input is selected, shows the frequenc y and preset number . When the DISPLAY button is pressed, sho ws the listening mode and input source format. However, does not sho w the source format when the FM or AM source is selected.
E Volume display
Shows the v olume le vel.
F SLEEP indicator
Lights when the sleep timer is turned on.
4
|
|
|
> |
|